How To Cut Scraps for 9-Patch Quilt Blocks

How To Cut Scraps for 9-Patch Quilt Blocks

Print Friendly and PDF

A year ago, I posted a tutorial for sorting fabric scraps. I decided to supplement that post with a quick tutorial for cutting fabric scrap squares for 9-patch blocks. Because of their versatility, 9-patch blocks are great for making scrap quilts. The easiest square size to start with is 5 inches should you have a lot of Charm Pack and Layer Cake scraps.

SQUARE SIZES


The easiest square size to start with is 5" should you have a lot of Charm Pack and Layer Cake scraps.
  • 5 inch - Finished Size: 4½ inch   (12.5 cm - Finished Size: 6.25 cm )
  • 2¾ inch - Finished Size: 2¼ inch   (7 cm - Finished Size: 3.5 cm)
  • 2 inch - Finished Size: 1½ inch   (5 cm - Finished Size: 2.5 cm)

YOU WILL NEED

  • A good assortment of quilt cotton fabric scraps
  • Iron and ironing board
  • Rotary cutter (have fresh blades available)
  • 6" x 12" and/or 8" x 8" quilt ruler

INSTRUCTIONS


1. Separate your scraps into individual colours: yellow, orange, purple, red, etc. This is a very important step. You don't want to have to sort little 2-inch squares by colour, trust me!

2. Sort scraps by size. 


3. Press all the scraps before cutting. A quick way to do this is to layer about 4 to 6 pieces and steam press.


4. Before cutting squares, stack several pieces and line up the top right corner.


5. Line up your ruler about 1/4" away from the top right corner of the fabrics and trim.


6. Rotate the fresh-cut corner to the lower left. Line up your square size at the corner and trim. If some of the offcuts are large enough, cut squares from these as well.


STORING YOUR SQUARES

Store your squares neatly according to colour. Over time you'll accumulate a lot of squares, so finding the right box for them is a good idea. I normally use plastic bins from the dollar store. The container below is a cookie tray from Costco. Use whatever works.


Quilting room storage: Revamped vintage dresser

This is a great storage idea that I wanted to share. I can't afford much for storage furniture so I normally have to think outside the box to furnish my sewing room. I picked this little mid-century modern dresser at a thrift store. I desperately needed more storage for my batting, backing and those miscellaneous things that needed a home.


I forgot to take the before picture but, basically, the original was sprayed in a dark stain and had super ugly drawer handles. After combing over ideas on Pinterest, I came up with this. I really love how it turned out. And I can keep an awful lot of stuff in these drawers.

Refurbished mid-century vintage dresser - image 1

UPDATE: June 2021
Dresser was sold for $150. I paid $40 for the
original so I made a $110 profit.😀
I used that $$ to buy IKEA shelving for my studio.

Vintage Sewing Machine Mini Quilt

This is my most recent foundation pieced pattern, Vintage Sewing Machine mini quilt pattern. I have this piece in my studio and love the bright colours. It measures 15" x 15" (37.5cm x 37.5cm) and would make a perfect little project for your sewing room.


Feather Your Nest Table Runner

I had a great summer! I finished up some UFOs and I have some beautiful new patterns to launch in the next few months. I'm sure you'll love them as much as I do.

My new pattern launch for this month is my Feather Your Nest table runner pattern. I had been seeing the feather block all over the internet and had to make my own pattern for it. My method for making the feathers is simple. My instructions are thorough and easy to follow, so don't be afraid to jump right in and give it a try. This pattern is great for using up your scraps. The finished table runner is 38" x 14". The pattern also includes instructions for making a single 12" x 12" block shown below.


Festher Your Nest table runner pattern

Great tips for finishing your UFOs: Includes FREE Block Pattern

Great tips for finishing your UFOs: Includes FREE Block Pattern


For the past few weeks, I've been working on my unfinished quilt projects aka UFOs. I gave myself an official UFO challenge. I decided to share some of my tips for starting your own UFO challenge and finally getting your unfinished projects done.

1. Get everything out in the open.

Pull out all of your UFOs, and I mean all of them! Lay them out and review exactly what you're dealing with.

2. Weed out the rejects.

Look at each UFO and decide which ones you'll keep and which ones you can part with. Some UFOs are UFOs for a reason. Maybe the colours are wrong, the pattern is boring, or the workmanship is poor. Don't spend precious sewing time on projects that don't thrill you. If a project doesn't make the grade, let it go. Use it for a scrap quilt or give it away.

3. Store each UFO where you can see it.

After you've sorted out your projects, store them where you can see them. I use clear plastic 12" x 12" scrapbook bins that I buy at Michael's. I prefer to use see-through bins so I can see my project at a glance. You could also use those clear bags that you get with new sheets. Also, Ziploc makes a really nice storage bag that would be perfect for storing projects. 

Quilting Project Bins
Project bins for my UFOs
(12" x 12" scrapbooking bins from Michaels)


4. Buy what you need to finish each project.

Write down a list of items that you'll need to complete each UFO. Check if you need thread, fabric, quilt backing, etc. and take a shopping trip to pick these things up. After you get your supplies put them in the project bins. If you get your supplies ahead of time everything will be ready for you when you start. You also won't be tempted to put the project aside again until you get to the fabric store.

5. Start with easiest first.

Start with the easy projects first and work your way up to the ones that need more attention. I find starting with the less demanding UFOs keeps me motivated.

6. Do a little each day

There's no need to overwhelm yourself. Even if it's only 15 or 30 minutes, work on your project every day. You'll be amazed at how much you can get done in a short time. Try setting goals for yourself to finish something each day.


Binding made and ready to quilt.


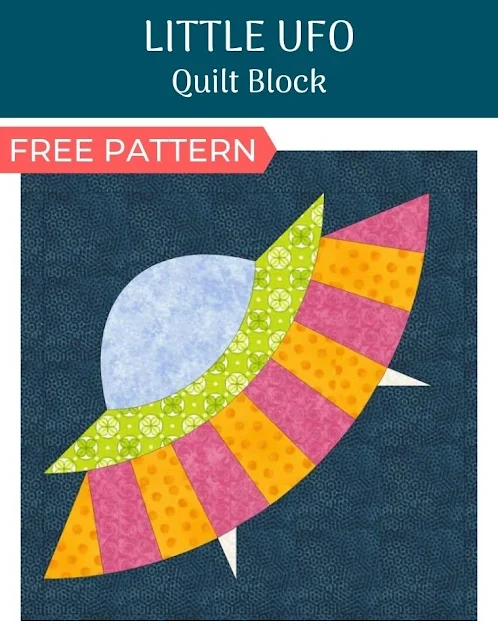
Download FREE Little UFO quilt block

Basic Color Theory for Quilters

Basic Color Theory for Quilters


Print Friendly and PDF

The fabrics you choose for your quilt can really make or break your project. I prefer not to stumble blinding when picking my colors but choosing from all the beautiful fabrics out there can be overwhelming. There are many wonderful pre-cuts that make most of the color decisions for you, but it's still good to know at least the basics of color theory.

To get started learning color theory, purchase the color wheel by Dritz that is specifically for quilters. The color wheel will help you choose colors a little more easily.


COLOR WHEEL COMBINATIONS
Below are the basic five color combinations you can get from the color wheel. I use one of these as a starting point when planning quilt colors. With practice, choosing fabrics will become easier starting with just these five combinations.

Download FREE PDF of these five combinations HERE

MONOCHROMATIC
Different shades and tints of the same color.
MONOCHROMATIC


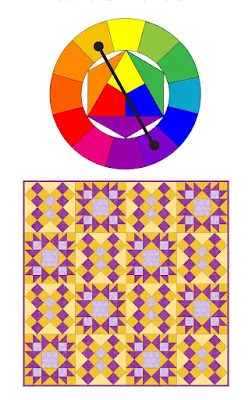
COMPLEMENTARY
Colors that are across from each other on the color wheel.
COMPLEMENTARY


ANALOGOUS 
Colors that are beside each other on the color wheel.
ANALOGOUS

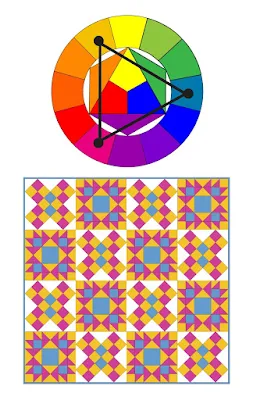
SPLIT COMPLEMENTARY 
The base color (e.g. red) and the colors that are adjacent to that color's complement (e.g. green).
SPLIT COMPLEMENTARY

TRIAD 
Three colors that are evenly spaced on the color wheel.
TRIAD

How to Download + Print PDF Quilt Patterns

How to Download + Print PDF Quilt Patterns

Print Friendly and PDF

When I first started selling my quilt patterns I decided to offer them in downloadable PDF format only. It's much more cost-effective for both my customers and me. Printing costs for patterns are expensive and those costs are normally absorbed by the customer along with mailing costs. Another advantage of buying PDF files is that you don't have to wait days for your pattern; instant gratification!

I thought it would be helpful for my readers and customers to have a list of five hassle-free steps for downloading and printing them. I will be including these steps with all my patterns from now on.


What is a downloadable PDF file?


A PDF (Portable Document Format) "is a file format that provides an electronic image of text or text and graphics that looks like a printed document and can be viewed, printed, and electronically transmitted." -- Google Dictionary

1. Get Adobe Acrobat Reader

 
Before you can download your PDF pattern you will first need the Adobe Acrobat Reader on your computer. Click to download the Acrobat Reader for free HERE.

2. Create a pattern folder

 
Create a pattern folder on your hard drive to keep your purchased PDFs. You can call the folder Patterns or Bought Patterns or whatever makes sense to you. If you buy a lot of quilt patterns online, you could also create subfolders for particular designers or quilt types.

3. After you buy your pattern, where do you find it to download it?


 After you purchase your pattern most sellers allow you to download your file immediately from their site and/or will email it to you. If your file is emailed and you can’t see it, check your email “Junk” folder in case the file was read as spam. It's important to download the emailed PDF files promptly because some might have only a limited time frame (e.g. 72 hours) for you to do so. If you register with a seller, such as Etsy, they will provide you with a personal order history page where you can retrieve your patterns at any time.

Important: Whichever website you purchase your PDF pattern from, read their instructions for downloading or contact the site's tech support.

4. Rename and download your PDF


Some PDF pattern files you buy only make sense to the seller, e.g. AQS-pattern-144-1.pdf. So, before downloading your PDF to your computer, rename your quilt pattern file something that makes sense to you, e.g. pattern name quilt type_designer.pdf

5. Print your pattern correctly

 
Before printing your PDF file set the "Page Scaling" option in the print setup box to “Actual Size” or “None.” (Fig 1) This will ensure your quilt pattern templates are printed to the correct size for your project.

Figure 1

6. Measure the 1 inch square if there is one.


After printing your pattern, measure the 1-inch square (test block) that is provided on the template page of your pattern instructions. If the test block measures too large or too small, double check the printer setup box and reprint the pattern. If there is no test block, measure the templates as best you can to be sure they're the correct size. (Fig. 2)

Printing PDF quilt patterns - one inch test block
Figure 2