Showing posts with label Quilting Studio. Show all posts

Rescue Your Quilts! Fix & Prevent Fabric Bleed

How to Prevent & Fix Fabric Bleed on Quilts


One of the most disappointing things that can happen to a quilter is fabric bleed. We spend long hours cutting and piecing our precious creation. So, when it comes out of the wash with colours bleeding, it can be devastating. 

I've been working on a red and white Christmas quilt lately and wanted to prevent this disaster before it happened. These are some of the tip and tricks I gathered for preventing and fixing quilt bleed.

PREVENTION

  • Prewash your all your coloured fabrics before cutting them up. I never did this until I started reading about other people's guilt bleed nightmares.

  • When your quilt is finished, wash it alone in cold water.  Add 1 cup of salt to the wash with a mild laundry soap. I use Woolite® 

  • Commercial "colour catchers" sheets are another option. These are laundry sheets you put in your wash load to prevent colour runs. There are several on the market you can try.

FIXING

  • If there are only a few spots of bleed through on white fabric, spray the area with a mild water and bleach solution (3 part water to 1 part bleach in a spray bottle). Then, rub with a small amount of Dawn® dish soap and water. In place of the water/bleach spray, my secret to getting stains and bleed out of whites is Clorox Clean-Up® spray. It's normally used to clean hard surfaces but works on white fabrics as well.

  • In the event of a real disaster (God forbid), Dawn® dish soap to the rescue!
    Go to Susie Quilts for full instructions for fixing a badly bled quilt.

I hope these tips and tricks for quilt bleeds have been helpful. If you have anymore ideas for "quilt bleed", please leave them in the comments.

The more things change . . .

                        . . . the more they stay the same.


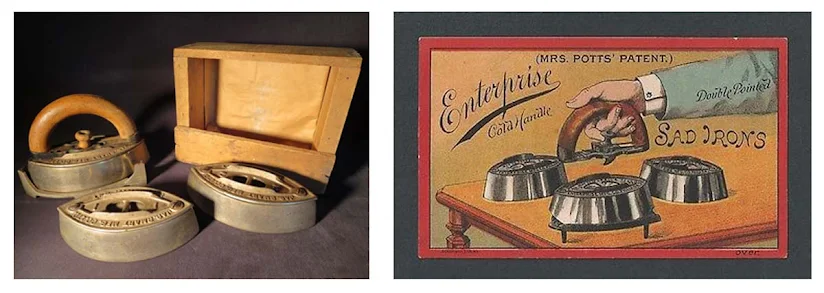
I bought two irons this month that were manufactured over 100 years apart and was intrigued by how similar they were in design. Both have a double point base, a rounded handle, and need to be placed on a heat source before ironing. The technology for each iron was vastly different, but the concept was the same.

I bought the older iron at my favourite antique shop. It's a Mrs. Potts Cold Handle Sad Iron. The "sad" in sad iron is from the Middle English word sad which meant solid or heavy. 

The second iron was a Panasonic Cordless 360° Freestyle™ Steam/Dry Iron. This iron is so similar to the Sad Iron I suspect the designers at Panasonic really knew their clothes iron history.

Mrs. Mary Florence Potts


Who is Mrs. Potts and What is a Sad Iron?

Mrs. Potts was born Mary Florence Webber in 1850 in Iowa, US. When she was 17 she married Joseph Potts who was a Civil War veteran 17 years her senior.

In 1871, at 19 years old, Mrs. Potts patented the Cold Handle Sad Iron changing the clothing iron industry forever and making her one of the most famous woman of her time. The wooden handle stayed cool for ironing and was detachable so that the user could keep several iron bases on the stove at one time then switch to a new hot iron when the first iron cooled.


The Sad Iron Kit

When Sad Irons came on the market in the late 1800s the Mrs. Potts Sad Iron Set sold for a whopping 0.70 cents! The set came with three iron bases, a detachable wooden handle, and a trivet. You could also buy the bases separately if you needed more.

Sad Irons were used well into the 1940s; mainly because some rural communities still didn't have electricity. The Sad Iron was manufactured until 1951.

Sad Iron Kit and Trading Card

Sad Iron Kit and Trade Card


Sad Iron Trading Cards

Trade cards were a very popular form of advertising in Victorian times and thousands were used to  advertise the Potts' Sad Iron. The cards were quite comical and sometimes quite racist.


THE CHILDREN CRY FOR IT

I guess the message in this trading card is
"So easy a child can use it." Sure. What could go wrong?

GIRL: "Oh Ma! I want to stay home and iron, this new iron is so nice."
MOTHER: "What? Not gone to school yet. You'll catch it."


MRS. POTTS IRON VS THE THERMOMETER

Not sure what the message is in this trading card.
Maybe the woman loves using her new Sad Iron so much
she's heating up the house with it? How much ironing does this woman have?!

HUSBAND: "Gracious! Do stop ironing. I am sweating fearfully just sitting here."
WIFE: "Well dear, you know I use those Mrs. Potts' Cold Handle Sad Irons
and I am just delighted with them."


THE WATERMELON SEASON AT BLACKSVILLE

Blacksville?! 
This trade card suggests using the Sad Iron as a compress for a
child's stomach ache?! And it's racist AF!

WOMAN: "Ah Chile. Yous bin eatin' dem watermillyons. Come yere honey.
I'll just put dis ere Mrs. Potts' Iron to yer stomach. It retains
de heat and an will help yer. Dis season is bad for the chillum."

Make Your Own Best Press Citrus Spray Starch

Make Your Own Best Press Citrus Spray Starch


Print Friendly and PDF

I love Mary Ellen's Best Press Spray. It helps my blocks press crisp and there's no starchy residue. The only downside is that it's way too expensive, especially here in Canada. Also, I don't like the smell of most of their scents; the lavender-scented spray smells like cheap men's cologne. I thought of using the scent-free Best Press, but it costs more than the scented. So, I decided to try making the homemade version of Best Press and I was pleased with the results.

I wanted my spray to have a nice scent but most of the recipes I found called for lavender essential oil and I didn't care for it. So, I tried the citrus essential oils (i.e. lemon, lemongrass, bergamot, orange, etc.) and loved the fresh citrusy scent. I use bergamot exclusively now. Bergamot is a fresh, uplifting Italian orange oil used for cosmetics and perfumes. Below is the recipe for the DIY Citrus Best Press that works just as well as the real deal. 


DIY CITRUS BEST PRESS (Makes 3 cups)

INGREDIENTS (Revised July 29, 2022)
  • 1½ cups distilled water (it must be distilled because some tap water minerals can stain your fabric).
  • 1½ cup vodka. Use only vodka because it is clear and odorless.
  • ¼ to ½ tsp. bergamot essential oil or any citrus essential oil.

Combine all ingredients. Store in a spray bottle. Shake well before each use.

TOP 10 favourite things in my quilting studio


Like most of you, my studio had humble beginnings but, over time, evolved into a creative sanctuary. As in any good studio, there are special items that keep me inspired, grounded, and working efficiently. In no special order, these are the Top 10 things in my studio I would never part with.


1.  MY ART QUILT ON THE COVER OF QUILTING ARTS MAGAZINE

This framed Quilting Arts magazine cover featuring one of my art quilts helps to remind me that hard work and perseverance can pay off and that even though I've created some epic fails, I've also created some beautiful work that others can appreciate.

In 2012 my art quilt Mother Ship was selected to be published for the Quilting Arts magazine Readers Challenge. I was even more excited when I was told my art was going to be on the front cover of the magazine. The Readers Challenge was to create an art quilt interpreting the phrase "What If." Being a UFO/alien buff, I wondered "What if I saw a UFO over my house?" and I created a piece with a UFO floating over a row of suburban homes. I named the piece "Mother Ship"


2. FOLD DOWN MINI IRONING BOARD

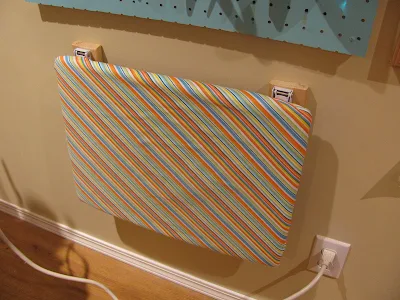
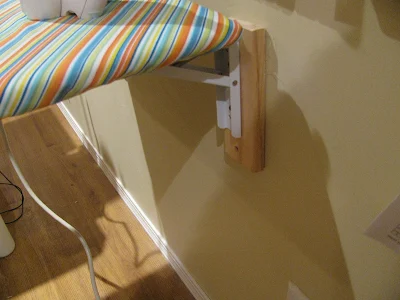
I used to use a TV table ironing board next to my sewing machine for small pressing jobs. However, I found it to be a real pain to move around when I didn't need it, and the legs would get caught in the electrical cords. So, I came up with a solution that works great for me. I took the legs off the ironing board and attached it to the wall with folding shelf brackets. It sits next to my sewing machine and is so convenient! When I don't need it I can fold it down out of the way and there are no legs getting tangled in the cords below.

I didn't make a tutorial for this project, but I found a helpful video on YouTube for attaching the table and brackets to the wall. If you want to give this project a try be sure to either hit a stud or use a strong screw anchor aka wall plug when attaching the folding bracket to drywall. I attached two boards to the wall and then attached the table brackets to these. There are many other options for making a folding wall table on Pinterest but I used folding brackets because I didn't want any obstructions under the table.

FOLD DOWN MINI IRONING BOARDFOLD DOWN MINI IRONING BOARD (2)
Folding Ironing Table | Detail

3.  WOODEN SEWING SCISSORS

My husband is an intarsia artist and not long ago we put our heads together to make this sewing room decor project. I designed the pattern for the scissors and my husband put it together. 


4.  WOODEN INTARSIA SEWING MACHINE

This is another combined effort by my husband and me. Again, I designed the pattern and he built it. I think it turned out so cute! I am not sure if I'll be selling this pattern, but if I do I'll be sure to let you know. We used a small nail to represent the sewing machine needle and a vintage wooden spool cut in half for the thread. How cool is that?


5. SCRAPPY FABRIC LAMPSHADE

This pretty little lampshade is so easy to make and a great way to use up your leftover fabric strips. I had the little lamp hanging around forever and wasn't quite sure what to do with it until I saw this project on Pinterest. (CAUTION: Regular incandescent bulbs can get quite hot and cause a fire hazard with all that fabric, so I used a 9W LED bulb).


6. MY JUKI SEWING MACHINE

My JUKI 2010TL-Q is my pride and joy. It's a real workhorse. This Juki has a powerful motor and a long neck which makes it perfect for my free-motion machine quilting.  You could sew through at least five layers of denim like butter with this thing, not that I'd do that but it's a testament to the power of this machine. It's also pretty low maintenance and very easy to use. I designed a wrap-around pin cushion for my machine (shown here) for my post on pin cushions last year. You can download the free pattern HERE.


7.  VINTAGE SEWING MACHINE BOOKENDS

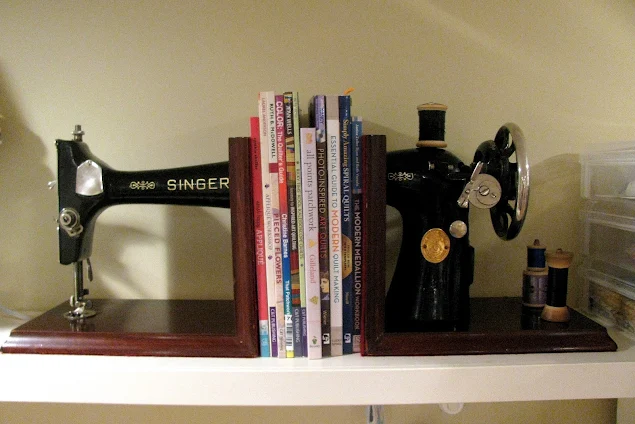
I think this is the coolest thing I've ever bought for my studio. It's a vintage Singer sewing machine cut in half and turned into bookends. We purchased the lamp from Prairie Pickers just outside of Winnipeg. Greg, the seller, said he had a heck of a time cutting the machine but was very proud of it when it was done. He was happy to see it going to a good home.


8. REFURBISHED STORAGE DRESSER

I desperately needed a clean, dry place to keep my quilt batting and backing and thought an old dresser would do the trick. After some searching, I bought a rickety old mid-century vintage dresser for $40. With a few coats of paint and some stain, I turned it into this stylish storage dresser. This idea has freed up a lot of space in my studio!  

Update: Sold my dresser for $125! Used the $$ to buy Ikea shelving for my studio.


9. VINTAGE FLOWER POT PIN CUSHION

I came across this pin cushion project at Lovely Little Handmaids and knew I had to make one. I picked up a vintage planter at the flower shop and turned it into this adorable little pin cushion. Actually, it's so precious I'm afraid to use it in case it breaks. To keep it stable I glued stones to the bottom before adding the cushion. This gave it some needed weight and made it less tippy. You can get my tutorial for making your own vintage pot pin cushion HERE.


10. SEWING NOTIONS BOX

If you haven't guessed by now, I enjoy upcycling old stuff. I picked up this jewellery box at Goodwill for $5. It was originally stained a dark yucky brown but I saw it's potential as a box for my quilting odds and ends. As they say, it had good bones. It's the best way for me to keep all my notions in one place.


Quilting room storage: Revamped vintage dresser

This is a great storage idea that I wanted to share. I can't afford much for storage furniture so I normally have to think outside the box to furnish my sewing room. I picked this little mid-century modern dresser at a thrift store. I desperately needed more storage for my batting, backing and those miscellaneous things that needed a home.


I forgot to take the before picture but, basically, the original was sprayed in a dark stain and had super ugly drawer handles. After combing over ideas on Pinterest, I came up with this. I really love how it turned out. And I can keep an awful lot of stuff in these drawers.

Refurbished mid-century vintage dresser - image 1

UPDATE: June 2021
Dresser was sold for $150. I paid $40 for the
original so I made a $110 profit.😀
I used that $$ to buy IKEA shelving for my studio.

4 Must-Have Irons for Quilting

4 Must-Have Irons for Quilting

Print Friendly and PDF

In a previous post, I showed you how to make your own quilters ironing board. In this post, I’m going to talk about irons for quilting and introduce you to the four irons that I've used over the years with good results. A quilter’s ironing needs are very specific. We might need several types of irons depending on our projects, but there are so many irons on the market it can be mind-boggling choosing the right ones.


Three guidelines when buying an iron for quilting:

  • Determine your needs. Do you quilt only occasionally or is your iron going to get a full workout? Do you do patchwork, applique or both?
  • Do your homework. Research different products.
  • Purchase the best iron you can realistically afford. There are many good irons at different price points, so shop around if you're on a strict budget like most of us.

1. Steamfast Mini Steam Iron

My Steamfast Mini Iron is my little workhorse. It sits beside me on my TV table ironing board when I'm doing all my piecing. It's the perfect size for paper foundation piecing and is great for pressing down seams and fused applique pieces. It heats up fast and stays hot.


2. Rowenta Focus II Iron

It's important to have a good basic iron for quilting. A top functioning iron is worth its weight in gold. My rule of thumb is to buy the best iron that you can afford. Top quality irons come at various price points. Also, you likely don't need all the bells and whistles for quilting so do your research. When I turned 60 last year, I treated myself to a brand new iron, a very sexy Rowenta Focus II. The German made Rowentas are considered the best steam irons on the market. It took me a while to decide on a new iron, but after some research, I settled on this one; I'm so glad I did. This iron is an absolute gem. I know the Oliso iron has been toted as the must-have iron for quilting, but the reviews for the Rowenta were better.


UPDATE (January 15/22)

I'm sad to say that my Rowenta lasted only 6 years. It began to leak from the bottom. I truly loved that iron but it had to be replaced.

The Rowenta was replaced with the awesome Panasonic NI-WL600 Cordless. I've been using it for a couple of months and, although wary, I'm completely sold on it.


KEY FEATURES of the Panasonic NI-WL600 Cordless Iron

  • CORDLESS, 1500W STEAM/DRY IRON End the hassle of twisted, tangled power cords for quicker, easier, more convenient ironing on a variety of fabrics.
  • IRON IN EVERY DIRECTION Sleek, contoured 360° Freestyle soleplate has a double-tipped design to ensure natural movement in any direction. Iron effortlessly forward, backward and even side-to-side for precision and speed.
  • ADJUSTABLE STEAM & DRY SETTINGS – Set to HIGH for heavier and everyday fabrics, LOW for more delicate fabrics and quick, easy touch-ups or choose DRY for easy ironing when no steam is needed.
  • HEAT, STEAM AND DRY SETTINGS Apply the perfect level of heat and steam, or no steam with the touch of button; a powerful vertical steam feature quickly removes wrinkles on curtains and hanging garments.
  • MAXIMUM PORTABILITY A matching lightweight, heat-resistant carrying case snaps easily onto the iron and power base after use for instant portability and storage
    From: Panasonic Website

3. Mini Iron

The Clover Mini Iron is a must have for doing fusible web applique, especially when pressing down small pieces or long appliqued stems. I like that the tip is small enough so I can see what I'm doing.


Mini Iron Stand

My only beef with this mini iron is that the stand you get with it is not great. I use an old plate to put the hot end on when I'm working but I'd highly recommend you get yourself a wooden stand like the one below. This stand would be easy to make if you have the tools but for $10.39 at Connecting Threads, it's not going to break the bank to buy one.


4. Petite Press Mini Iron

I bought the Petite Press Mini Iron not too long ago when I had a project with lots of applique work. It heats up well, has a digital temperature setting, attached rest, adjustable handle and the ironing tip is double the size of the Clover. Over time, I could see this mini iron taking the place of my Clover.


QUILTERS PRESSING ACCESSORIES


1. Tailor's Clapper


I don't have these pressing accessories, but I felt they were interesting enough to let you know about them. Click on the links to get more info on these products. Tailor's Clapper This wooden block is used to press down seams after they've been ironed.

2. Teflon Pressing Sheet

Teflon Pressing Sheet A heatproof Teflon sheet for applique that keeps sticky stuff off your iron.


DISCLAIMER: This article is my own personal review of these products. I do not receive compensation in any form from the companies referred to in this post.

Sewing Machine Bookends: Cool quilting room décor


Last weekend hubby and I took a nice drive in the country to pick up these incredible vintage sewing machine bookends for my sewing room. Aren't these the coolest things you've ever seen? I first saw similar bookends on Pinterest, so I had my eye on these for a while after seeing them on a Facebook group. I was happy the artist, Greg at Prairiepickers.com, still had the bookends when I finally texted him last week to buy them. They cost $100. I thought that was a very good deal considering all the work that went into them.

Vintage sewing machine bookends | Monica Curry's quilting studio.

The sewing machine is circa 1920s. Even the wooden bases are from an old sewing machine table. Greg told me he normally upcycles the bases of vintage sewing machines into tables. He said he's usually left with the machine when the table is finished. So, he decided to make something out of a machine because he didn't want to throw it out.

Vintage sewing machine bookends - detail 1

The set even came with some vintage wooden spools of thread. I would love to find more of these spools.

Vintage sewing machine bookends - detail 2

DIY Quilter's Ironing Board

DIY Quilter's Ironing Board

Print Friendly and PDF

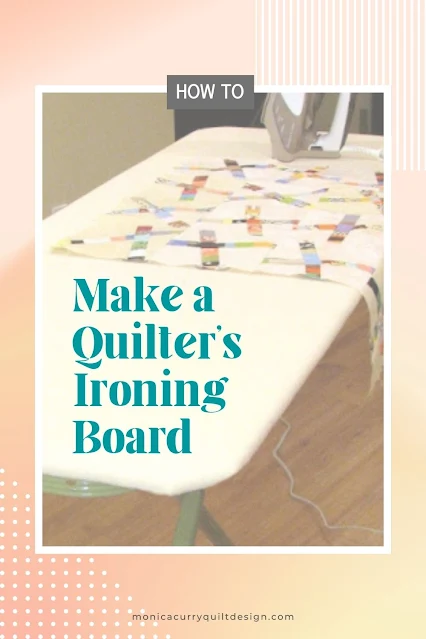
HOW TO MAKE A QUILTERS IRONING BOARD

I've used a regular ironing board for quilting my whole life. So, when I started seeing these wide ironing boards for quilting, I knew I had to have one. I wish I'd made one of these years ago because it truly makes a difference when ironing quilt tops. If you have an ironing board, you can make one of these quilting boards yourself in a day.

SUPPLIES
  • Standard metal ironing board
  • 20" x 55" - 3/8" or 1/2" plywood (No saw? Most hardware stores will cut this for you.)
  • [8] screws
  • [8] washers
  • [1] 26" x 60" cotton duck fabric.
  • [1] 24" x 60" insulated batting. (I used Insul-Brite® by Warm Company)
  • [2] 24" x 60" 100% cotton quilt batting TOOLS
TOOLS
  • Measuring Tape
  • Pencil
  • Screwdriver
  • Handsaw
  • Sandpaper
  • Staple gun and staples shorter than the thickness of your board
INSTRUCTIONS

1.  Measure and mark 1½ inches from the corners of the board. (Fig.1).


Figure 1

2.  Cut this amount off the corner a hand saw. (Fig. 2)


Figure 2

3.  Staple the fabric and batting layers evenly around the edge of the board in this order.
 (Fig. 3)

Layer 1:  Quilt Batting
Layer 2:  Insul-Brite® batting shiny side up
Layer 3:  Dotton Duck 
Layer 4:  Removable cotton ironing board cover.


Figure 3


Figure 3 (Detail)

4.  Place ironing board upside down onto the board top being sure it is lined up correctly.
Mark where each screw will go. (Fig. 4)


Figure 4

5. Screw the screws with the washers through the holes in the mesh. (Fig 5)


Figure 5

6. Tada!! Your new ironing board is now ready to be enjoyed.