Showing posts sorted by relevance for query colour. Sort by date Show all posts

4 Quilting Apps You Can Not Live Without: 2016


UPDATED: June 06, 2021

Back when I first started quilting, I struggled with yardage calculations, resizing blocks and any other kind of quilting math. Everything was done manually back then. Most of the time I'd just wing it when it came to buying yardage, but that was risky. Resizing blocks was done with graph paper and pencil unless I had a magazine to give me the templates. I didn't even have a rotary cutter! Now technology is helping quilters with all this math stuff and I love it. Here are four quilting apps that will make your quilting a little easier.
"Master the math involved in quilting! Robert Kaufman Fabrics and Quilters Paradise have joined forces to bring you this updated collection of eight essential quilting calculators. Designed by quilters, the calculators work with both U.S. and metric measurements. With these tools you’ll easily and accurately work out how many rectangular pieces can be cut from a larger piece, or how much fabric is needed for backing, batting and borders, square-in-a-square, set-in and corner triangles."

I love this app because it does all the quilting math work for you, which is great for me because I'm pretty much math-challenged. It has several calculations, but my favorites are backing and batting measurements, binding yardage needed, and piece count (calculates the number of pieces you can cut from a larger piece of fabric).

2. Quilt Creator by Crochet Designs
"Create quilts using over 200 quilt blocks to select from. You can then change the colors in the blocks to get the look you want."

3. How Much Thread by Superior Threads (This app is no longer available)

4. Color Gear by Appsvek ($1.99)
"Color Gear is a handy professional tool that helps to create harmonious colour swatches. To find the perfect colour combination, designers and artists use colour theory and the basis of it: colour wheel and harmonies. You don't need to be a colour expert in order to use this app – Color Gear is a user friendly application suitable for beginners and pro. Perfect app for understanding colour theory and daily working with palettes. Works offline."

How to Make Flange Quilt Binding


I love flange quilt binding. It gives quilts an elegant and finished look. I don't use it on all my projects, but sometimes a quilt needs that extra pop. Flange binding takes a little extra work, but it's well worth the effort when you see the finished result. I made the following tutorial as comprehensive as possible and hope it will help you give flange binding a try.


INSTRUCTIONS


1)  CALCULATE THE LENGTH OF BINDING YOU WILL NEED FOR YOUR QUILT


EXAMPLE:
Finished quilt size = 54" × 60"

  • (54" × 2) + (60" × 2) + 10" = 238" (10" extra is added for finishing the binding). 
  • (238" ÷ 36") = 6.6 yards
  • You will need 6.6 ≈ 7 yards of binding for a 54" × 60" finished quilt. 

2)  WIDTHS TO CUT FOR FLANGE AND MAIN COLOUR STRIPS

  1. Decide on a binding width you need.
  2. Use the chart below to get the widths to cut the strips for main colour and the flange.


3)  ASSEMBLING & ATTACHING BINDING


  1. Sew both strips together lengthwise with a 1/4" seam allowance.
    Press the seam towards the main colour strip.


  2. Fold the strips over lengthwise (wrong sides facing), line up the top edges and press.


  3. With right side of quilt down, stitch binding around the edge of the quilt
    with a ¼ seam allowance.


  4. Fold binding to the front of the quilt and stitch-in-the-ditch between the
    flange and the main colour.


DETERMINE YARDAGE NEEDED FOR BINDING STRIPS


1.  CALCULATE NUMER OF STRIPS TO CUT BASED ON YOUR FABRIC WIDTH

EXAMPLE 238" (length of binding in inches) ÷ 42" (fabric cross grain width) = 5.6 ≈ 6 strips


2.  CALCULATE THE YARDAGE NEEDED FOR YOUR STRIPS


MAIN STRIPS
EXAMPLE 
  • 1.25" x 6 (number of strips needed) = 7.5" + 2" = 9.5" (2" added for uneven edges).
  • Yardage needed for main colour strips: 9.5" x 42"
FLANGE STRIPS
EXAMPLE  
  • 1.5" x 6 (number of strips needed) = 9" + 2" = 11" (2" added for uneven edges).
  • Yardage needed for flange strips: 11" x 42"

How to Accurately Cut Fabric for Foundation Paper Piecing

How to Accurately Cut Fabric for Foundation Paper Piecing


Print Friendly and PDF

I love foundation paper piecing (FPP), but one of the most frustrating problems I had when I was a newbie was coming up short. I would be happily piecing my block, go to flip the next section to press it, and crap! It would be too short or too thin or both. Even worse, I'd be pressing a finished block and find a "hole" at a seam where a piece came up short...ugh! I eventually discovered a method that has worked great for me.

I first saw this technique in Simply Amazing Spiral Quilts by RaNae Merrill. I modified it slightly by using freezer paper. It's a simple and foolproof method for cutting your FPP fabric pieces. This method is especially great for when you have multiples of the same block.

INSTRUCTIONS


YOU WILL NEED
  • Foundation piecing template that has been mirrored.
  • 8½" x 11" sheet of freezer paper
  • Scissors
  • Rotary cutter
  • Quilting ruler
  • Fabrics for your block
  • Coloured pencils or markers to match your fabrics.


1. Print your template on the dull side of your freezer paper.


2. Colour each section of the template with the fabric colour you want to use for that section. If a section is a white or cream colour, you can make a symbol to represent that colour or leave it blank.


3. Cut out each freezer paper section into separate pieces and lay them on the corresponding fabric with the right side of the fabric facing up. Leave a generous space all the way around each section. Press lightly with a hot iron to get the freezer paper to stick. If you need multiples of the same section, you can place the freezer paper sections on 4 to 5 layers of fabric.


4. With your quilt ruler, cut ¾ inch allowance around each section.


5. All your cut sections should look like this when you're done. They're now ready to be pieced with no surprises. It's important to NOT remove the freezer paper from the top of the stack. Pick up your fabric pieces from the bottom so you will know which piece it is.

Quilting with White Fabric: Pros & Cons

Quilting with White Fabric

White background fabrics make stunning quilts. The high contrast makes the colours pop. However, there are a few pitfalls when using white fabric that can be frustrating and even ruin your quilt. I made this featured quilt for my mother-in-law and almost didn't give it to her. But, I was in a crunch for time so I decided to gift it to her anyway and hope she didn't notice too many of the flaws. If she did notice, she never said anything.

TIPS FOR QUILTING WITH WHITE FABRIC

1.  USE A LIGHT COLOURED BACKING FABRIC

Because I was in a hurry, I used the quilt-as-you-go method to assemble this quilt. To make it "reversible" I used a variety of scrap layer cakes for the backing. I don't know if it was the batting (Hobbs Heirloom Fusible White Cotton) but the coloured background, as you can see below, showed right through to the front! Try using light coloured backing when using white.


2.  BUY ENOUGH WHITE FABRIC FROM THE SAME BOLT

When you buy your white fabric, purchase enough for the whole project. Even if white fabric is from the same dye lot and colour number, shades can vary slightly. I ran out of  white for this project and used left over white from another project. They looked the same under the studio lighting. But, when my hubby held up the quilt in the sunny kitchen, the left over white pieces definitely had a yellow cast.

3.  AVOIDING & FIXING "SHADOWS"

I love Foundation Paper Piecing (FPP) and have done many blocks using this technique. When I used a white fabric in a FPP project for the first time, however, frustrating "shadows" from the darker seams showed through.  Be sure to trim your darker seams before putting your blocks together. Also, check for any dark threads that my show through.

4.  BEST WAYS TO PREVENT FABRIC BLEED

Any quilt can bleed colours, but quilts with white backgrounds can be ruined by colour bleed. Here are a few tips to prevent this problem:
  • Prewash your fabrics, especially reds and purples.

  • When your quilt is finished, wash it alone on cool setting.  Add 1 cup of salt to the wash with a mild laundry soap.

  • "Color catchers" are another option. These are laundry sheets you put in your load to prevent colour runs while allowing mixed washes. There are several on the market you can try.

  • If there are only a few spots of bleed through on the white fabric after washing, spray the area with a mild water and bleach solution (3 part water to 1 part bleach in a spray bottle) rub with a small amount of Dawn dish soap and water.  
    My secret trick for getting stains and bleed off whites is Clorox Clean-Up® spray. It's normally used to clean hard surfaces but seems to work on fabrics as well.

Quilting Hack for Stray Threads and Seam Shadows by Thistledown and Company Quilts 


White Fabric: Is it worth the trouble? by Karen Brown at Just Get It Done Quilts

CELTIC TWIST Quilt Block | Step-by-Step Tutorial


This tutorial is for the 17" x 17" Celtic twist block shown above. It may look complicated, but it's simple to put together. There are no Y-seams and no templates to worry about. The block consists of two 6 inch units (one is a snowball block) and two different sized triangle units; that's it! You can make one block or add more units to make a quilt or table runner. I love this block for showcasing big prints.

These are the four units to make the block.

MATERIALS NEEDED FOR ONE BLOCK
(All measurements include a 1/4 inch seam allowance)

Unit 1 - Makes 4
[8] 5" x 2" dark print
[8] 5" x 2" light print
[4] 3½" x 3½" medium print

Unit 2 - Makes 4
[1] 7¼" solid

Unit 3 - Makes 4
[2] 7" solid
[4] 2" x 2" dark print

Unit 4 - Makes 1
[1] 6½" x 6½" large print
[4] 2" x 2" light print

UNIT 1 - Make 4

1. Arrange your fabric pieces to ensure you have the correct colour placement. You'll need [2] 5" x 2" dark print; [2] 5" x 2" light print; and [1] 3½" square medium print to make one 6" block.


2. Place the square and first piece right sides facing and start stitching 1 inch from the top of the square.


3. Flip and press the first piece. Place the next piece right sides facing and stitch to end.


4. Flip and press the last piece you stitched. Place the next piece right sides facing and stitch to end.


5. Flip and press the last stitch pieced. Pull back and pine the first piece sewn on and pin back. Place the last piece right sides facing and stitch to end. Flip back and press.


6. Fold back the first piece as shown and stitch to just past the starting point of your first stitches.


7. Press completed block.


UNIT 2 (One square makes four triangles)

1. Cut [1] 7¼ solid colour square.
2. Cut the square diagonally to each corner to make four triangles.


UNIT 3 - Make 4

1. Pin one [1] 2" dark print square with right sides facing on opposite corners of the 7" solid colour square and stitch as shown. Cut a 1/4 inch seam allowance from each corner square, flip and press back.

2. Cut from corner to corner parallel to stitched corners to make two triangles.


UNIT 4 - Make 1

1. Cut [1] 6½ inch large print square and [4] 2" light print squares. Pin one 2" square with right sides facing on each corner of the larger square as shown.


2. Cut a corner inch seam allowance from each corner square, flip back, and press.


BLOCK ASSEMBLY DIAGRAM

How To Make Fabric Foundations for Fabric Art


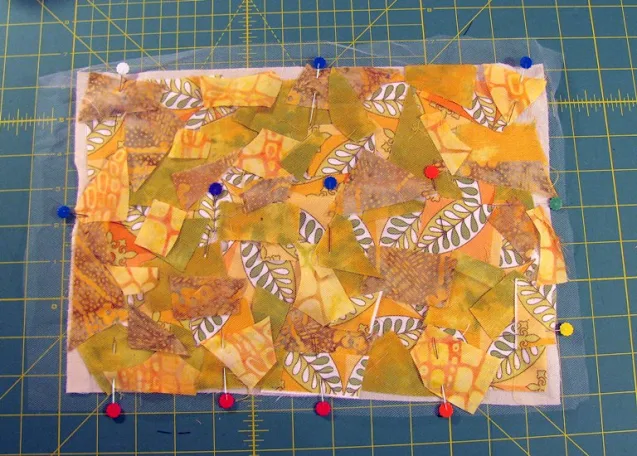
Are you looking for ways to use up small fabric scraps that are too small for anything? I discovered a fun way to do this by making what I call scrap sandwiches. It's not a new concept, but I couldn't find any good tutorials for it, so I decided to make my own instructions. I’ll sometimes spend an afternoon making these. It’s a fun and mindless project that produces interesting and beautiful textures and colour combinations that can be incorporated into your art quilts or mixed media projects. I’ve used them for quilt art postcards, makeup bags, and book covers. 

Fabric sandwiches were incorporated into my art quilt Mother Ship that's on the Fall 2012 Quilting Arts Magazine cover in Fall 2012.


Sister Moon by Monica Curry - Fabric Collage
Sister Moon by Monica Curry

Knowledge by Monica Curry - Fabric Collage
Knowledge by Monica Curry

Salmon Run by Monica Curry - Fabric Collage
Salmon Run by Monica Curry

Untitled by Monica Curry - Fabric Collage
Untitled by Monica Curry

INSTRUCTIONS


YOU WILL NEED
  • Fabric scraps.
  • Lightweight muslin or any lightweight non-stretchy fabric cut to 9 x 12 inches.
  • One piece of tulle cut to 11 x 14 inches.
  • Thread
  • Pins
  • Sewing machine
While working on a project, I throw my fabric scraps in a box I have under my work table. After I have a big enough stash of scraps, I sort everything according to colour and store them in plastic bags.

fabric scraps for mixed media art


1.  FOUNDATION LAYER
Start your sandwich with a lightweight, non-stretchy, foundation piece approximately 9 inches by 12 inches. This is the easiest size to work with. I use a light, inexpensive muslin for the foundation, but anything lightweight and non-stretchy will work. You can also use a coloured foundation that works with the scrap colours.

mixed media fabric art 1

2.  MIDDLE LAYER
Pick the colours you want to work with. You can use monochromatic colours, contrasting colours, or grab a bunch of random colours. Start placing your fabric scraps down on the foundation until you've covered it as much as you can.

mixed media fabric art 2

mixed media fabric art 3

3.  TOP LAYER
After all the scraps are put down on your foundation layer, cover these two layers with a piece of tulle about two inches wider than your foundation piece (11" x 14") giving you an overhang of 1 inch all the way around. Pin these three layers down around the edges and in the middle.

mixed media fabric art 4

4.  STITCH AROUND OUTER EDGE
Once the three layers are pinned securely, stitch around the edge of the sandwich with a basting stitch creating a seam width of about 1/2 inch.

mixed media fabric art sewing

mixed media fabric art sewing detail

5.  QUILT
After you’ve sewn around the edge, sew a line across the length and the width of the sandwich. Then stitch a grid at least 3" in width. Your grid can be as small as you like, but don’t go wider than 3" because your scraps could start to shift around too much during the next step.

mixed media fabric art finished

6.  When you’ve completed stitching your grid, you now get a chance to use some of those decorative stitches you have on your sewing machine. If you’re like me, you may not use them very often. Pick a decorative stitch and, starting at one edge of the sandwich, sew to the other edge. There is no hard and fast rule about this. Just pick out a bunch of nice stitches to use and sew along the sandwich randomly. I experimented with my alphabet stitch for this project and really liked the outcome. You can also use free-motion stitching which can produce some beautiful results.

mixed media fabric art details

7.  When all your stitching is complete, trim the excess tulle along the outer seam line to clean up the edges. I do this because I find the excess tulle snags on things when you work with the sandwich later.

8.  Turn the sandwich over face down and press on the wrong side so you don’t gum up your iron with melted tulle. You can see in this photo the grid width and where I’ve sewn the decorative stitches randomly across the sandwich.


TIPS

  • Sprinkle thread, ribbon, yarn, or lace scraps on top of the fabric layer before adding the tulle layer.
  • Try using a foundation piece made from used dryer sheets that have been stitched together.
  • Print images or lettering on fabric that can be incorporated into the scrap layer.
  • If the piece isn’t going to be washed, add bits of pretty paper or newsprint to the scrap layer.
  • Use a foundation piece colour to coordinate with the scraps.
  • Experiment and have fun!

    Rescue Your Quilts! Fix & Prevent Fabric Bleed

    How to Prevent & Fix Fabric Bleed on Quilts


    One of the most disappointing things that can happen to a quilter is fabric bleed. We spend long hours cutting and piecing our precious creation. So, when it comes out of the wash with colours bleeding, it can be devastating. 

    I've been working on a red and white Christmas quilt lately and wanted to prevent this disaster before it happened. These are some of the tip and tricks I gathered for preventing and fixing quilt bleed.

    PREVENTION

    • Prewash your all your coloured fabrics before cutting them up. I never did this until I started reading about other people's guilt bleed nightmares.

    • When your quilt is finished, wash it alone in cold water.  Add 1 cup of salt to the wash with a mild laundry soap. I use Woolite® 

    • Commercial "colour catchers" sheets are another option. These are laundry sheets you put in your wash load to prevent colour runs. There are several on the market you can try.

    FIXING

    • If there are only a few spots of bleed through on white fabric, spray the area with a mild water and bleach solution (3 part water to 1 part bleach in a spray bottle). Then, rub with a small amount of Dawn® dish soap and water. In place of the water/bleach spray, my secret to getting stains and bleed out of whites is Clorox Clean-Up® spray. It's normally used to clean hard surfaces but works on white fabrics as well.

    • In the event of a real disaster (God forbid), Dawn® dish soap to the rescue!
      Go to Susie Quilts for full instructions for fixing a badly bled quilt.

    I hope these tips and tricks for quilt bleeds have been helpful. If you have anymore ideas for "quilt bleed", please leave them in the comments.

    How To Cut Scraps for 9-Patch Quilt Blocks

    How To Cut Scraps for 9-Patch Quilt Blocks

    Print Friendly and PDF

    A year ago, I posted a tutorial for sorting fabric scraps. I decided to supplement that post with a quick tutorial for cutting fabric scrap squares for 9-patch blocks. Because of their versatility, 9-patch blocks are great for making scrap quilts. The easiest square size to start with is 5 inches should you have a lot of Charm Pack and Layer Cake scraps.

    SQUARE SIZES


    The easiest square size to start with is 5" should you have a lot of Charm Pack and Layer Cake scraps.
    • 5 inch - Finished Size: 4½ inch   (12.5 cm - Finished Size: 6.25 cm )
    • 2¾ inch - Finished Size: 2¼ inch   (7 cm - Finished Size: 3.5 cm)
    • 2 inch - Finished Size: 1½ inch   (5 cm - Finished Size: 2.5 cm)

    YOU WILL NEED

    • A good assortment of quilt cotton fabric scraps
    • Iron and ironing board
    • Rotary cutter (have fresh blades available)
    • 6" x 12" and/or 8" x 8" quilt ruler

    INSTRUCTIONS


    1. Separate your scraps into individual colours: yellow, orange, purple, red, etc. This is a very important step. You don't want to have to sort little 2-inch squares by colour, trust me!

    2. Sort scraps by size. 


    3. Press all the scraps before cutting. A quick way to do this is to layer about 4 to 6 pieces and steam press.


    4. Before cutting squares, stack several pieces and line up the top right corner.


    5. Line up your ruler about 1/4" away from the top right corner of the fabrics and trim.


    6. Rotate the fresh-cut corner to the lower left. Line up your square size at the corner and trim. If some of the offcuts are large enough, cut squares from these as well.


    STORING YOUR SQUARES

    Store your squares neatly according to colour. Over time you'll accumulate a lot of squares, so finding the right box for them is a good idea. I normally use plastic bins from the dollar store. The container below is a cookie tray from Costco. Use whatever works.