Like most of you, my studio had humble beginnings but, over time, evolved into a creative sanctuary. As in any good studio, there are special items that keep me inspired, grounded, and working efficiently. In no special order, these are the Top 10 things in my studio I would never part with.
1. MY ART QUILT ON THE COVER OF QUILTING ARTS MAGAZINE
This framed Quilting Arts magazine cover featuring one of my art quilts helps to remind me that hard work and perseverance can pay off and that even though I've created some epic fails, I've also created some beautiful work that others can appreciate.
In 2012 my art quilt Mother Ship was selected to be published for the Quilting Arts magazine Readers Challenge. I was even more excited when I was told my art was going to be on the front cover of the magazine. The Readers Challenge was to create an art quilt interpreting the phrase "What If." Being a UFO/alien buff, I wondered "What if I saw a UFO over my house?" and I created a piece with a UFO floating over a row of suburban homes. I named the piece "Mother Ship"
In 2012 my art quilt Mother Ship was selected to be published for the Quilting Arts magazine Readers Challenge. I was even more excited when I was told my art was going to be on the front cover of the magazine. The Readers Challenge was to create an art quilt interpreting the phrase "What If." Being a UFO/alien buff, I wondered "What if I saw a UFO over my house?" and I created a piece with a UFO floating over a row of suburban homes. I named the piece "Mother Ship"

2. FOLD DOWN MINI IRONING BOARD
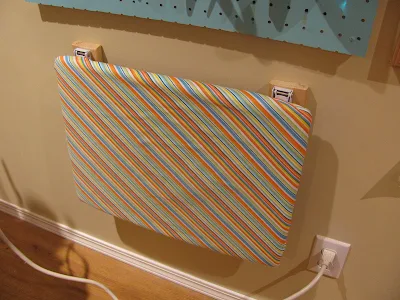
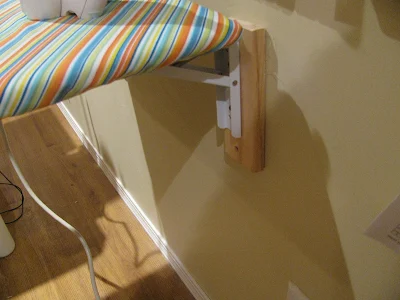
I used to use a TV table ironing board next to my sewing machine for small pressing jobs. However, I found it to be a real pain to move around when I didn't need it, and the legs would get caught in the electrical cords. So, I came up with a solution that works great for me. I took the legs off the ironing board and attached it to the wall with folding shelf brackets. It sits next to my sewing machine and is so convenient! When I don't need it I can fold it down out of the way and there are no legs getting tangled in the cords below.
I didn't make a tutorial for this project, but I found a helpful video on YouTube for attaching the table and brackets to the wall. If you want to give this project a try be sure to either hit a stud or use a strong screw anchor aka wall plug when attaching the folding bracket to drywall. I attached two boards to the wall and then attached the table brackets to these. There are many other options for making a folding wall table on Pinterest but I used folding brackets because I didn't want any obstructions under the table.
3. WOODEN SEWING SCISSORS
My husband is an intarsia artist and not long ago we put our heads together to make this sewing room decor project. I designed the pattern for the scissors and my husband put it together.

4. WOODEN INTARSIA SEWING MACHINE
This is another combined effort by my husband and me. Again, I designed the pattern and he built it. I think it turned out so cute! I am not sure if I'll be selling this pattern, but if I do I'll be sure to let you know. We used a small nail to represent the sewing machine needle and a vintage wooden spool cut in half for the thread. How cool is that?
5. SCRAPPY FABRIC LAMPSHADE
This pretty little lampshade is so easy to make and a great way to use up your leftover fabric strips. I had the little lamp hanging around forever and wasn't quite sure what to do with it until I saw this project on Pinterest. (CAUTION: Regular incandescent bulbs can get quite hot and cause a fire hazard with all that fabric, so I used a 9W LED bulb).


6. MY JUKI SEWING MACHINE
My JUKI 2010TL-Q is my pride and joy. It's a real workhorse. This Juki has a powerful motor and a long neck which makes it perfect for my free-motion machine quilting. You could sew through at least five layers of denim like butter with this thing, not that I'd do that but it's a testament to the power of this machine. It's also pretty low maintenance and very easy to use. I designed a wrap-around pin cushion for my machine (shown here) for my post on pin cushions last year. You can download the free pattern HERE.
7. VINTAGE SEWING MACHINE BOOKENDS
I think this is the coolest thing I've ever bought for my studio. It's a vintage Singer sewing machine cut in half and turned into bookends. We purchased the lamp from Prairie Pickers just outside of Winnipeg. Greg, the seller, said he had a heck of a time cutting the machine but was very proud of it when it was done. He was happy to see it going to a good home.
8. REFURBISHED STORAGE DRESSER
I desperately needed a clean, dry place to keep my quilt batting and backing and thought an old dresser would do the trick. After some searching, I bought a rickety old mid-century vintage dresser for $40. With a few coats of paint and some stain, I turned it into this stylish storage dresser. This idea has freed up a lot of space in my studio!
Update: Sold my dresser for $125! Used the $$ to buy Ikea shelving for my studio.

9. VINTAGE FLOWER POT PIN CUSHION
I came across this pin cushion project at Lovely Little Handmaids and knew I had to make one. I picked up a vintage planter at the flower shop and turned it into this adorable little pin cushion. Actually, it's so precious I'm afraid to use it in case it breaks. To keep it stable I glued stones to the bottom before adding the cushion. This gave it some needed weight and made it less tippy. You can get my tutorial for making your own vintage pot pin cushion HERE.

10. SEWING NOTIONS BOX
If you haven't guessed by now, I enjoy upcycling old stuff. I picked up this jewellery box at Goodwill for $5. It was originally stained a dark yucky brown but I saw it's potential as a box for my quilting odds and ends. As they say, it had good bones. It's the best way for me to keep all my notions in one place.



.jpg)


.jpg)


