6 Free, Quick, & Easy Christmas Table Runners


Weather you need a last minute Christmas gift or something new for your winter décor, these quick, easy, and free table runners are for you. They are all created with basic quilt blocks and simple appliqué.

Wishing you all a wonderful holiday season!

Joyful Snowflake

by Ameroonie Designs

Learn how to make multiple Half Square Triangles for this pattern HERE.


Starry Ornament


Learn how to make multiple Half Square Triangles for this pattern HERE.


Snowflake Quilt


Nordic Star


Learn how to make multiple Half Square Triangles for this pattern HERE.


Fun Poinsettia


Learn an easy method for making the Drunkard Path block
used for the Fun Poinsettia pattern HERE.


Wonky Wonky Little Star

by Cathy @ Blue Berry Patch


Rescue Your Quilts! Fix & Prevent Fabric Bleed

How to Prevent & Fix Fabric Bleed on Quilts

One of the most disappointing things that can happen to a quilter is fabric bleed. We spend long hours cutting and piecing our precious creation. So, when it comes out of the wash with colours bleeding, it can be devastating.

I've been working on a red and white Christmas quilt lately and wanted to prevent this disaster before it happened. These are some of the tip and tricks I gathered for preventing and fixing quilt bleed.

PREVENTION

  • Prewash your all your coloured fabrics before cutting them up. I never did this until I started reading about other people's guilt bleed nightmares.

  • When your quilt is finished, wash it alone in cold water.  Add 1 cup of salt to the wash with a mild laundry soap. I use Woolite® 

  • Commercial "colour catchers" sheets are another option. These are laundry sheets you put in your wash load to prevent colour runs. There are several on the market you can try.

FIXING

  • If there are only a few spots of bleed on white fabric, spray the area with a mild water and bleach solution (3 part water to 1 part bleach in a spray bottle). Then, rub with a small amount of Dawn® dish soap and water. In place of the water/bleach spray, my secret to getting stains and bleed out of small areas on whites is Clorox Clean-Up® spray. It's normally used to clean hard surfaces but works on white fabrics as well.

  • In the event of a real disaster (God forbid), Dawn® dish soap to the rescue!
    Go to Susie Quilts for full instructions for fixing a badly bled quilt.

I hope these tips and tricks for quilt bleeds have been helpful. If you have anymore ideas for "quilt bleed", please leave them in the comments.

Quilting with White Fabric: Pros & Cons

Quilting with White Fabric

White background fabrics make stunning quilts. The high contrast makes the colours pop. However, there are a few pitfalls when using white fabric that can be frustrating and even ruin your quilt. I made this featured quilt for my mother-in-law and almost didn't give it to her. But, I was in a crunch for time so I decided to gift it to her anyway and hope she didn't notice too many of the flaws. If she did notice, she never said anything.

TIPS FOR QUILTING WITH WHITE FABRIC

1.  USE A LIGHT COLOURED BACKING FABRIC

Because I was in a hurry, I used the quilt-as-you-go method to assemble this quilt. To make it "reversible" I used a variety of scrap layer cakes for the backing. I don't know if it was the batting (Hobbs Heirloom Fusible White Cotton) but the coloured background, as you can see below, showed right through to the front! Try using light coloured backing when using white.


2.  BUY ENOUGH WHITE FABRIC FROM THE SAME BOLT

When you buy your white fabric, purchase enough for the whole project. Even if white fabric is from the same dye lot and colour number, shades can vary slightly. I ran out of  white for this project and used left over white from another project. They looked the same under the studio lighting. But, when my hubby held up the quilt in the sunny kitchen, the left over white pieces definitely had a yellow cast.

3.  AVOIDING & FIXING "SHADOWS"

I love Foundation Paper Piecing (FPP) and have done many blocks using this technique. When I used a white fabric in a FPP project for the first time, however, frustrating "shadows" from the darker seams showed through.  Be sure to trim your darker seams before putting your blocks together. Also, check for any dark threads that my show through.

4.  BEST WAYS TO PREVENT FABRIC BLEED

Any quilt can bleed colours, but quilts with white backgrounds can be ruined by colour bleed. Here are a few tips to prevent this problem:
  • Prewash your fabrics, especially reds and purples.

  • When your quilt is finished, wash it alone on cool setting.  Add 1 cup of salt to the wash with a mild laundry soap.

  • "Color catchers" are another option. These are laundry sheets you put in your load to prevent colour runs while allowing mixed washes. There are several on the market you can try.

  • If there are only a few spots of bleed through on the white fabric after washing, spray the area with a mild water and bleach solution (3 part water to 1 part bleach in a spray bottle) rub with a small amount of Dawn dish soap and water.  
    My secret trick for getting stains and bleed off whites is Clorox Clean-Up® spray. It's normally used to clean hard surfaces but seems to work on fabrics as well.

Quilting Hack for Stray Threads and Seam Shadows by Thistledown and Company Quilts 


White Fabric: Is it worth the trouble? by Karen Brown at Just Get It Done Quilts

Make Super Easy Checkerboard Blocks - SCRAP BUSTER!

make super easy checkerboard blocks


INSTRUCTIONS

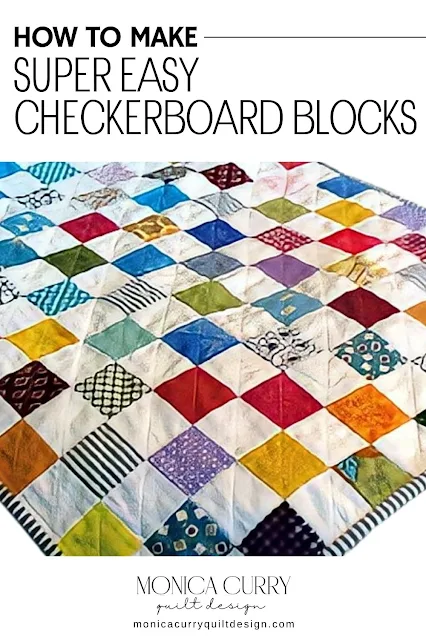
I discovered this technique for making scrap checkerboard blocks several years ago. I used it to make my grand-niece a doll quilt (above). With these few easy steps, the results are so worth it. When you're finished, every square will be aligned perfectly and you'll have a strong base to join the blocks so they won't stretch out of shape.

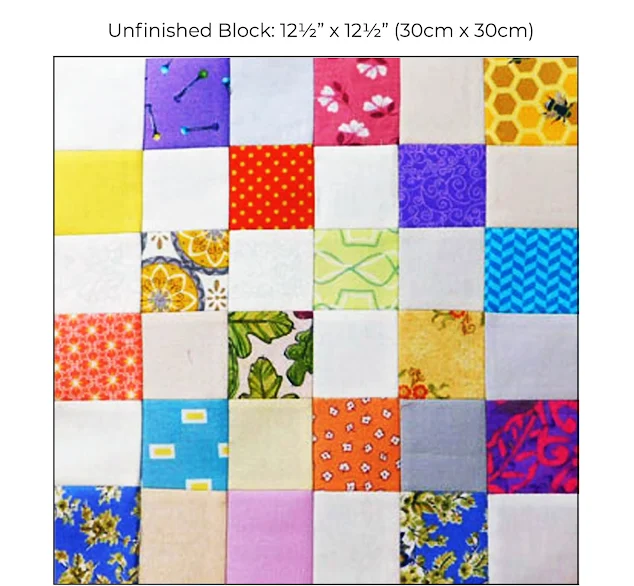
Finished Block: 12"x 12" (30 cm x 30 cm))

1.  First, you'll need a non-woven, lightweight, single-sided fusible interfacing. I purchased this very inexpensive one on Amazon.


2.  Cut [18] 2½-inch (6 cm) colour squares and [18] 2½-inch (6 cm) light colour squares.

3.  Cut [1] 13" x 13" (31 cm x 31 cm) square of interfacing.

4.  Place squares 1/2" from the edges on the adhesive side of the interfacing. Butt together the squares as shown below alternating between light and dark colours.


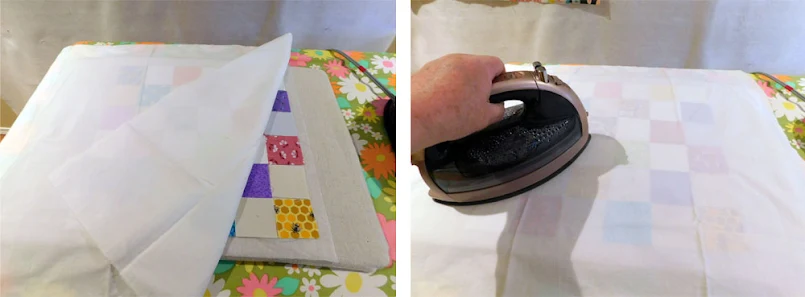
5.  Place a piece of cotton over the squares and press to adhere them to the fusible web.


6. Fold the first row right sides facing and sew a  "fat" 1/4" seam allowance. Repeat this until all the rows are stitched.


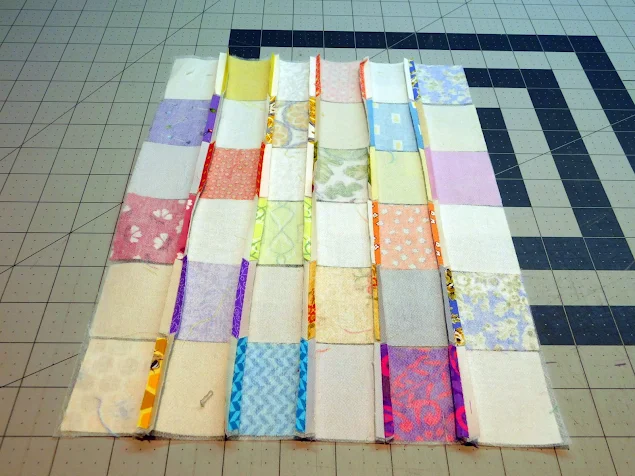
7.  Your first set of rows will look like this.


8.  Trim a about 1/8" off the edge of each seam row and press seam open. Be very careful to not cut the stitches!


9.  Stitch the horizontal rows and trim the seams the same as you did with the vertical rows.


10.  Press down all your seams. This is what your stitched squares will look like from behind.


11.  Press block and square up if necessary. You can see how precisely the squares are lined up.


If you need help organizing your scraps before you start, go to my scrap sorting tutorials below: