Showing posts with label Quilting Tips &Tricks. Show all posts

Three DIY Pin Cushion Ideas with Tutorials and Free pattern


Print Friendly and PDF

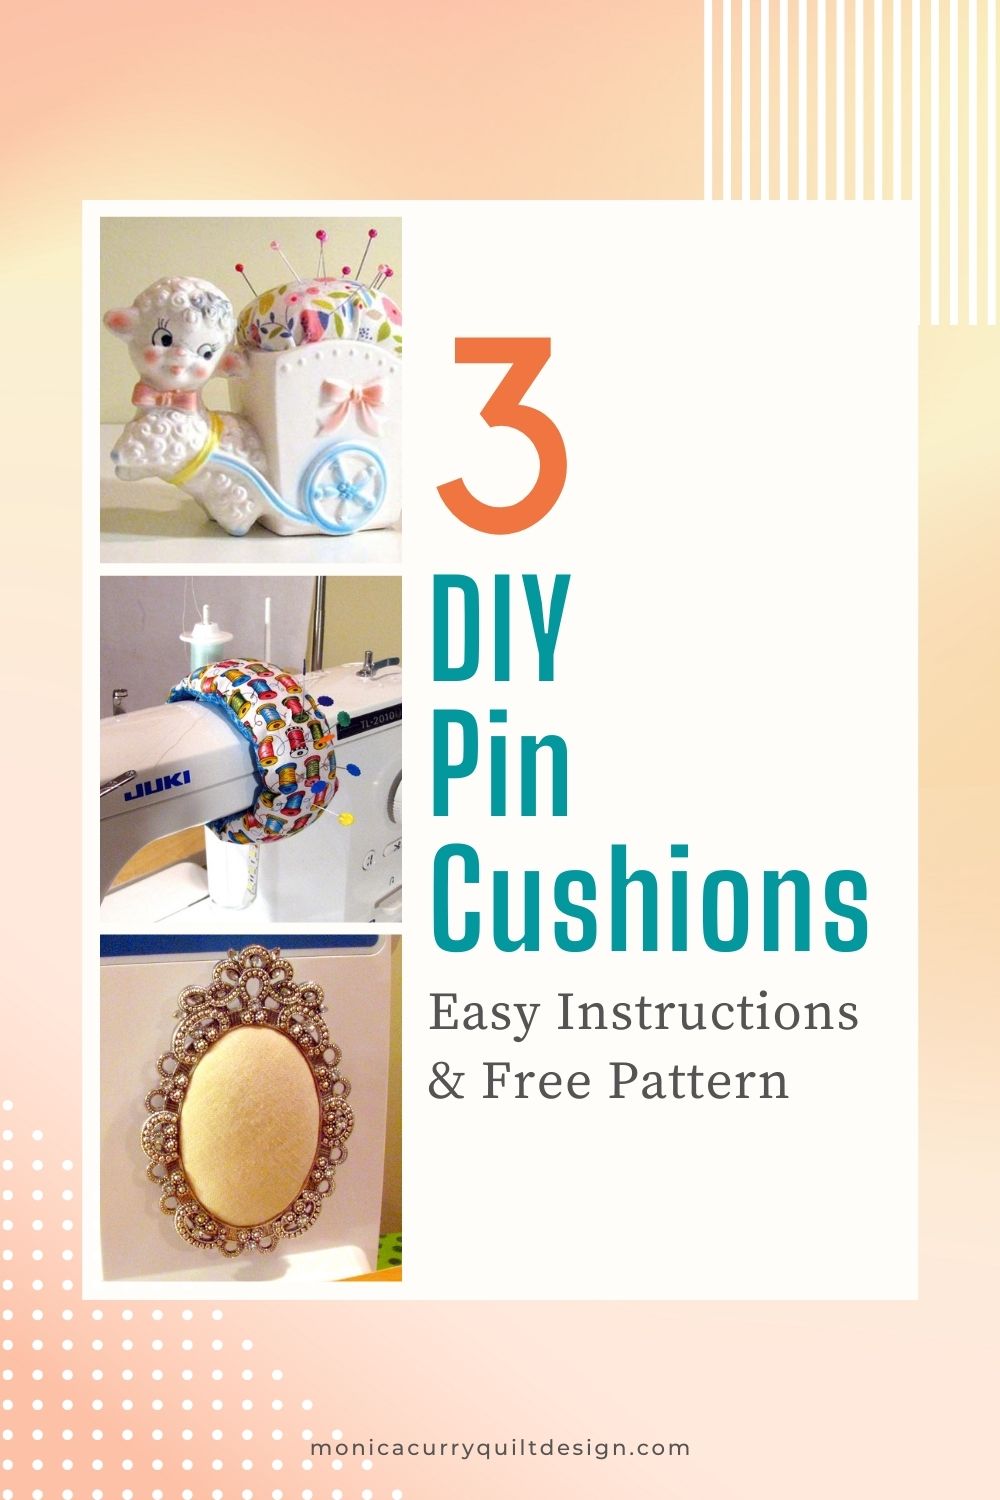
1. How to Make a Vintage Planter Pin Cushion

Pin cushions are an absolute necessity in any sewing studio. You usually don't realize this until you don't have one around when you need it. If you go online or on Pinterest, you'll see hundreds of different variations of a pin cushion. There was, however, one pin cushion I fell in love with. It's the vintage planter pin cushion.


I came across these little cuties at Lovely Little Handmaids and knew I had to make one. I picked up a vintage planter at the flower shop and, in no time, I made this adorable little pin cushion. See the instructions below to make your own. I think they would make great gifts for your sewing friends.

INSTRUCTIONS


You can probably find one of these little planters at a thrift shop or rummage sale for a few cents. You may also want to check out your local florist shop to see if they have any kicking around from days gone by. That's where I found mine.

Step One 

To give the pin cushion extra weight, glue pebbles to the bottom of the container with a glue gun.

Step Two

Measure the diameter of the opening of the container and cut a circular piece of fabric two inches larger than this measurement.

Step Three

With a strong thread, stitch around the edge of the fabric. Pull the thread to gather the fabric leaving an opening large enough to insert the filler.

Step Four

Stuff the fabric with lots of filler then tighten the thread and secure it with a knot.

Step Five

With a glue gun, apply hot glue around the inner edge of the container. Place the "fabric ball" into the container making sure it adheres to the glue.

2. How to Make a Juki 2010Q Wrap-Around Pin Cushion

I recently made this pin cushion for my new Juki 2010Q. I can't work unless this is wrapped around my machine. Don't you love the thread spools fabric? It's from the Cute As a Button fabric line by Delphine Cubitt. NOTE: This pattern can be customized to fit any sewing machine by adjusting the length of the end straps.


MATERIALS

  • [2] 4" x 24" strips of fabric of your choice.
  • [2] 1" pieces of hook and loop tape (Velcro®).
  • Toy stuffing or leftover quilt batting.

Download pin cushion pattern HERE


INSTRUCTIONS

1. Layer the two fabrics and fold in half at the center.


2. Pin the pattern on the fold and cut out the pieces.


3. With right sides facing, stitch a 1/4 inch seam from end to end as seen below. Leave the ends open, and leave a 3 inch opening on one side.


4. Turn stitched piece right side out and press.


5. Fold the piece in half vertically and place the template on it.

6. With a fabric marker or pencil, mark on the fabric the vertical lines on the template.

7. Stitch both vertical lines.


8. Stuff the pin cushion tightly with filler then hand or machine stitch closed. 

9. Fold in both ends 1/4 inch and stitch closed.

10. Stitch on the hook and loop tape at each end.

3. The Classic Mason Jar Pin Cushion

This is my go-to pin cushion for small mending jobs. The Mason jar (mine is a Gem jar) pin cushion is an all-time classic. You can find hundreds of these on Pinterest. There's that cute thread spool fabric again. Here's a great tutorial from The Seasoned Homemaker.


4. How to Make a Picture Frame Pin Cushion

Here is another pin cushion idea I used for my Pfaff machine. If you don't have any buttons on the front of your sewing machine, this pin cushion works great and looks ultra stylish.


INSTRUCTIONS

  1. Get a small pretty frame and remove the backing and glass.
  2. Cut a piece of thin cardboard the size of the backing.
  3. Cut a piece of fabric one inch larger than the cardboard piece.
  4. Glue some stuffing to the cardboard.
  5. Wrap and glue the fabric edges 3/4 of the way around the stuffing and the cardboard and let dry.
  6. Add more stuffing as needed and finish gluing fabric edges to the cardboard.
  7. Put the stuffed cardboard through the frame.
  8. Re-attach the frame backing to hold cushion in place.
  9. Use sticky-back Velcro® to adhere the finished pin cushion to the front of the sewing machine.

Recycle your Batting Scraps


Print Friendly and PDF

Over time, like most quilters, I end up with a lot of spare quilt batting pieces in all kinds of sizes. I don't throw any of these bits and pieces out, however. I keep them in a batting scrap box until I'm ready to recycle them. Here are three ways I recycle batting scraps. I hope this tutorial will encourage you to save your batting scraps and find a use for them.

USES FOR BATTING SCRAPS
  • stuffed toys
  • pin cushions
  • zipper bag stabilizer
  • bag straps
  • post cards
  • quilted coasters
  • One of the best ways to reuse batting scraps is to join them to make larger sheets of batting for your quilting projects. Below are two simple ways to do this.

ZIG-ZAG STITCH TOGETHER

1. Trim the rough edges of the batting.

2. Butt the trimmed edges together. Do not overlap them.

3. Join the two pieces with a wide zigzag stitch.


FUSE TOGETHER
I normally zig-zagged my pieces together but in a rush one day, I used a quicker method that I now prefer. I now recycle my batting bits by joining them together with fusible interfacing. It's so much faster than stitching them together, and they hold together very well this way.

YOU WILL NEED
  • batting chunks you want to join
  • rotary cutter
  • quilting ruler or regular ruler
  • strips of fusible interfacing. (I used Pellon Sheerweight interfacing, but a medium weight interfacing will work just as well. I'm also pretty sure there is such a thing as batting tape but the interfacing does the trick).
INSTRUCTIONS
1. Get your batting pieces and check if they are jagged on the edge or not (these are pretty jagged).


2. If the batting edges are jagged, trim a little off to make both edges straight.


3. Butt the two edges together as shown; don't overlap them.


4. Following the manufacture's instructions press the fusible interfacing securely to the batting.


5. This is something like what your batting will look like. Any puckers are not an issue because you won't see them once you sandwich your quilt.

How To Make Fabric Foundations for Fabric Art


Are you looking for ways to use up small fabric scraps that are too small for anything? I discovered a fun way to do this by making what I call scrap sandwiches. It's not a new concept, but I couldn't find any good tutorials for it, so I decided to make my own instructions. I’ll sometimes spend an afternoon making these. It’s a fun and mindless project that produces interesting and beautiful textures and colour combinations that can be incorporated into your art quilts or mixed media projects. I’ve used them for quilt art postcards, makeup bags, and book covers. 

Fabric sandwiches were incorporated into my art quilt Mother Ship that's on the Fall 2012 Quilting Arts Magazine cover in Fall 2012.


Sister Moon by Monica Curry - Fabric Collage
Sister Moon by Monica Curry

Knowledge by Monica Curry - Fabric Collage
Knowledge by Monica Curry

Salmon Run by Monica Curry - Fabric Collage
Salmon Run by Monica Curry

Untitled by Monica Curry - Fabric Collage
Untitled by Monica Curry

INSTRUCTIONS


YOU WILL NEED
  • Fabric scraps.
  • Lightweight muslin or any lightweight non-stretchy fabric cut to 9 x 12 inches.
  • One piece of tulle cut to 11 x 14 inches.
  • Thread
  • Pins
  • Sewing machine
While working on a project, I throw my fabric scraps in a box I have under my work table. After I have a big enough stash of scraps, I sort everything according to colour and store them in plastic bags.

fabric scraps for mixed media art


1.  FOUNDATION LAYER
Start your sandwich with a lightweight, non-stretchy, foundation piece approximately 9 inches by 12 inches. This is the easiest size to work with. I use a light, inexpensive muslin for the foundation, but anything lightweight and non-stretchy will work. You can also use a coloured foundation that works with the scrap colours.

mixed media fabric art 1

2.  MIDDLE LAYER
Pick the colours you want to work with. You can use monochromatic colours, contrasting colours, or grab a bunch of random colours. Start placing your fabric scraps down on the foundation until you've covered it as much as you can.

mixed media fabric art 2

mixed media fabric art 3

3.  TOP LAYER
After all the scraps are put down on your foundation layer, cover these two layers with a piece of tulle about two inches wider than your foundation piece (11" x 14") giving you an overhang of 1 inch all the way around. Pin these three layers down around the edges and in the middle.

mixed media fabric art 4

4.  STITCH AROUND OUTER EDGE
Once the three layers are pinned securely, stitch around the edge of the sandwich with a basting stitch creating a seam width of about 1/2 inch.

mixed media fabric art sewing

mixed media fabric art sewing detail

5.  QUILT
After you’ve sewn around the edge, sew a line across the length and the width of the sandwich. Then stitch a grid at least 3" in width. Your grid can be as small as you like, but don’t go wider than 3" because your scraps could start to shift around too much during the next step.

mixed media fabric art finished

6.  When you’ve completed stitching your grid, you now get a chance to use some of those decorative stitches you have on your sewing machine. If you’re like me, you may not use them very often. Pick a decorative stitch and, starting at one edge of the sandwich, sew to the other edge. There is no hard and fast rule about this. Just pick out a bunch of nice stitches to use and sew along the sandwich randomly. I experimented with my alphabet stitch for this project and really liked the outcome. You can also use free-motion stitching which can produce some beautiful results.

mixed media fabric art details

7.  When all your stitching is complete, trim the excess tulle along the outer seam line to clean up the edges. I do this because I find the excess tulle snags on things when you work with the sandwich later.

8.  Turn the sandwich over face down and press on the wrong side so you don’t gum up your iron with melted tulle. You can see in this photo the grid width and where I’ve sewn the decorative stitches randomly across the sandwich.


TIPS

  • Sprinkle thread, ribbon, yarn, or lace scraps on top of the fabric layer before adding the tulle layer.
  • Try using a foundation piece made from used dryer sheets that have been stitched together.
  • Print images or lettering on fabric that can be incorporated into the scrap layer.
  • If the piece isn’t going to be washed, add bits of pretty paper or newsprint to the scrap layer.
  • Use a foundation piece colour to coordinate with the scraps.
  • Experiment and have fun!