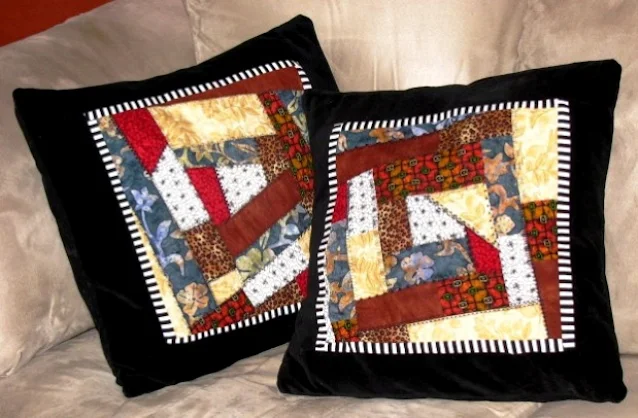
Crazy quilt pillows with video tutorial

I made these crazy quilt block pillows for our couch, and they really inject a bit of character into the room. I love crazy quilts but lack the patience and time for all that embroidery. So, now I use the fancy stitches on my sewing machine instead. My little Singer has the best decorative stitches, so I use that machine for crazy quilt blocks.

crazy quilt pillows monica curry


Below is a great tutorial by Fons & Porter for creating crazy blocks. (FYI: The quilt in the left background inspired my denim scrap quilt beach blanket.)

My new studio desk

I'm very proud of this little desk I created from a vintage sewing machine. I think the machine is circa 20s or 30s. I got it free from a friend of a friend, and it sat in my studio gathering dust for over a year until I finally had the time to make it useful. Some may think it's sacrilegious to hack a vintage machine like this, but it makes a great desk. I'm amazed at how much I could fit into those four little drawers.

Sewing Room Storage Tips


#1  
You can fit seven bobbins in a lipstick case.

 
Lipstick Case Bobbin Storage

Denim quilt made with scrap fabric

Denim scrap quilt made with denim and cotton upholstery fabric scraps.


Spirit Dancers Art Quilt

This is my art quilt Spirit Dancers. I created this piece for a local art show called Stone Age. It was the first art show I'd been in, so I was pretty excited. I think my piece was the only fabric art in the show.


I sold the piece quickly and then received a call from the gallery curator. Someone from Australia also wanted one before they flew back home. I then had to rush around to make a duplicate. I was lucky to still have some of the hand-dyed fabric I used.

Monica at the Stone Age art show with her fabric art Spirit Dancers 

How To Make Fabric Foundations for Fabric Art


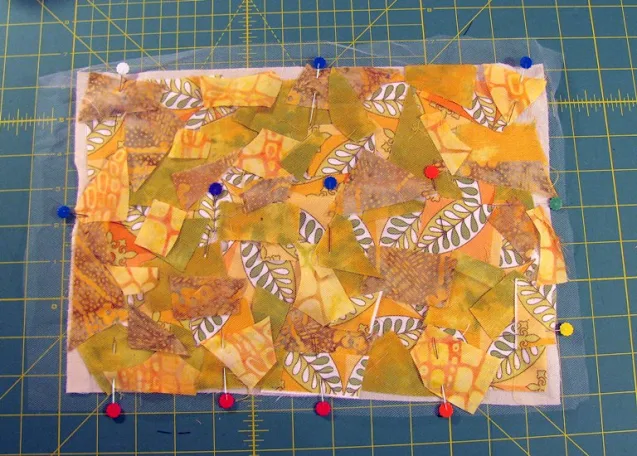
Are you looking for ways to use up small fabric scraps that are too small for anything? I discovered a fun way to do this by making what I call scrap sandwiches. It's not a new concept, but I couldn't find any good tutorials for it, so I decided to make my own instructions. I’ll sometimes spend an afternoon making these. It’s a fun and mindless project that produces interesting and beautiful textures and colour combinations that can be incorporated into your art quilts or mixed media projects. I’ve used them for quilt art postcards, makeup bags, and book covers. 

Fabric sandwiches were incorporated into my art quilt Mother Ship that's on the Fall 2012 Quilting Arts Magazine cover in Fall 2012.


Sister Moon by Monica Curry - Fabric Collage
Sister Moon by Monica Curry

Knowledge by Monica Curry - Fabric Collage
Knowledge by Monica Curry

Salmon Run by Monica Curry - Fabric Collage
Salmon Run by Monica Curry

Untitled by Monica Curry - Fabric Collage
Untitled by Monica Curry

INSTRUCTIONS


YOU WILL NEED
  • Fabric scraps.
  • Lightweight muslin or any lightweight non-stretchy fabric cut to 9 x 12 inches.
  • One piece of tulle cut to 11 x 14 inches.
  • Thread
  • Pins
  • Sewing machine
While working on a project, I throw my fabric scraps in a box I have under my work table. After I have a big enough stash of scraps, I sort everything according to colour and store them in plastic bags.

fabric scraps for mixed media art


1.  FOUNDATION LAYER
Start your sandwich with a lightweight, non-stretchy, foundation piece approximately 9 inches by 12 inches. This is the easiest size to work with. I use a light, inexpensive muslin for the foundation, but anything lightweight and non-stretchy will work. You can also use a coloured foundation that works with the scrap colours.

mixed media fabric art 1

2.  MIDDLE LAYER
Pick the colours you want to work with. You can use monochromatic colours, contrasting colours, or grab a bunch of random colours. Start placing your fabric scraps down on the foundation until you've covered it as much as you can.

mixed media fabric art 2

mixed media fabric art 3

3.  TOP LAYER
After all the scraps are put down on your foundation layer, cover these two layers with a piece of tulle about two inches wider than your foundation piece (11" x 14") giving you an overhang of 1 inch all the way around. Pin these three layers down around the edges and in the middle.

mixed media fabric art 4

4.  STITCH AROUND OUTER EDGE
Once the three layers are pinned securely, stitch around the edge of the sandwich with a basting stitch creating a seam width of about 1/2 inch.

mixed media fabric art sewing

mixed media fabric art sewing detail

5.  QUILT
After you’ve sewn around the edge, sew a line across the length and the width of the sandwich. Then stitch a grid at least 3" in width. Your grid can be as small as you like, but don’t go wider than 3" because your scraps could start to shift around too much during the next step.

mixed media fabric art finished

6.  When you’ve completed stitching your grid, you now get a chance to use some of those decorative stitches you have on your sewing machine. If you’re like me, you may not use them very often. Pick a decorative stitch and, starting at one edge of the sandwich, sew to the other edge. There is no hard and fast rule about this. Just pick out a bunch of nice stitches to use and sew along the sandwich randomly. I experimented with my alphabet stitch for this project and really liked the outcome. You can also use free-motion stitching which can produce some beautiful results.

mixed media fabric art details

7.  When all your stitching is complete, trim the excess tulle along the outer seam line to clean up the edges. I do this because I find the excess tulle snags on things when you work with the sandwich later.

8.  Turn the sandwich over face down and press on the wrong side so you don’t gum up your iron with melted tulle. You can see in this photo the grid width and where I’ve sewn the decorative stitches randomly across the sandwich.


TIPS

  • Sprinkle thread, ribbon, yarn, or lace scraps on top of the fabric layer before adding the tulle layer.
  • Try using a foundation piece made from used dryer sheets that have been stitched together.
  • Print images or lettering on fabric that can be incorporated into the scrap layer.
  • If the piece isn’t going to be washed, add bits of pretty paper or newsprint to the scrap layer.
  • Use a foundation piece colour to coordinate with the scraps.
  • Experiment and have fun!

    Picasso inspired art quilts

    "The Psychic" Art Quilt by Monica Curry
    The Psychic by Monica Curry


    The Dream Diary Art Quilt by Monica Curry
    The Dream Diary by Monica Curry


    My Hat From a Life Lived: Empty Nest

    The Empty Nest  
    Art Hat by Monica Curry


    This is my art hat The Empty Nest that was in the art show Hats From a Life Lived held in Fall 2014. The show was organised by Manitoba fibre artist Colette Balcaen and the concept for the show was quite beautiful.
    “When [Anastazja Urbanik] passed on at the age of 94, I received many of her hats. Now my project, Hats From a Life Lived, gives the opportunity to many artists to express an aspect of their life. The participants adapt a hat from another life to give it a new life."  
    Colette Balcaen 
    The Empty Nest was created to commemorate my journey that began 25 years ago after losing a child to an ectopic pregnancy. Prior to my miscarriage, I experienced many years of infertility, so this loss was especially tragic.

    I grew up during a time when women were often defined by their ability to have children. So, the experience of infertility and subsequent miscarriage forced me to explore my place in the world as a woman without children. Over the years, I’ve learned that the power of the feminine goes beyond childbearing. I’ve embellished the “nest” of the piece to accentuate the rich life I’ve had without children. The spiral of the piece represents the feminine life force. With or without children I believe this powerful force runs through all women and is our source of their strength and creativity.