Showing posts with label Tutorial. Show all posts

10 Great Canadian Online Fabric Stores

10 plus Great Canadian Online Fabric Stores

Print Friendly and PDF

Hello Canadian quilting friends! When I first started ordering fabric online, I initially went to the US online stores because of the lower prices. However, I quickly learned that I wasn't getting much of a bargain. It didn't take me long to realize I was better off shopping at Canadian online fabric stores. In some cases, the fabric prices may be slightly higher, but the price you pay online in Canadian is the price you pay without the duties, exchange rates, and high shipping costs to worry about.

Shopping USA: Let's do the math . . . 
Shipping costs from the US can sometimes be outrageous. Also, you have to take into account the current Canadian/US dollar exchange rate and cross border duty charges

As of this post, the exchange rate on the Canadian dollar is around 1.30. That's right, right now our dollar is only worth around 0.70 cents compared to the US $1.00. This means when you shop US stores online, you're paying 0.30 cents more on the dollar for your fabric. For example, a fabric at $10 US will cost you $13 CAD, and $100 US can jump to $130 CAD! And that's before shipping costs and duty.

I still prefer to shop at my local stores, but below are 10+ Canadian online fabric stores including their shipping rates. This is not an exhaustive list. I add new stores periodically.

Canadian Online Fabric Stores

(Last Update: August 21, 2021)
NOTE: Shipping rates listed here are subject to change.

Along Came Quilting (Calgary, AB)
A very nice selection of fabrics.
Shipping: Canada Post rates according to weight.

Bibs and Boots Fabric and Apparel (Dinsmore, SK)
Modern baby fabrics and apparel.
Shipping: Canada Post rates according to weight.

Canadian National Fabric (N/A)
Good selection quality fabrics. You can also collect points on your purchases.
Shipping: $5 flat rate shipping anywhere in Canada.

Club Tissus (Laval, QC)
This shop has all the bases covered: quilting fabric, sewing notions, knitting, fabric crafts, etc.,
Shipping available to residents of Canada only
Quebec and Ontario ─ $12.
The rest of Canada ─ $15.
Remote areas within Canada ─ $50.
An additional fee of $10 per item will be added for packages with non-standard weight or size.

NEW Christina's Fabrics
FREE For Orders $75+ - Before Taxes
Flat Rate Shipping:
Ontario
$6.00
The Rest of Canada
$10.00
Canada: Your estimated delivery time is 1-7 days.

Country Clothesline
(Toronto, ON)Shipping:
Shipping costs are calculated by Canada Post.
Free shipping over $150.


(Mount Brydges, Ontario)Good Selection of Wm. Morris cotton prints.
Shipping:
$1 - $25 - $10.00
$25 - $174 - $20
FREE shipping for orders over $175

Dinkydoo Modern Fabrics (Pitt Meadows, BC)
Very large selection of solids! Very nice selection of modern fabrics.
Shipping:
$8.99 flat rate under $99
FREE shipping for orders $99+

Fabric Spark (Toronto, ON)
Shipping:
$5 for orders up to $25
$8 to $11 for orders from $25 to $149
$150 and over - FREE

Flare Fabrics (Maberly, ON)
A lovely selection of batiks.
Shipping:
All Canadian orders under $20 get a flat shipping rate of $4.50
Ontario orders between $20.00 to $124.99 - $9.99
Quebec orders between $20 to $124.99 - $11.99
Rest of Canada orders between $20.00 to $124.99 - $13.99
All of Canada orders over $125 - FREE

Fridays Off Fabric Shop (Toronto, ON)
Has a nice selection of unusual modern prints.
Shipping:
Under $20 - $2.99
$20.01 to $45 - $5.95 flat rate.
$40.01 to $124.99 - Canada Post calculated shipping.
FREE shipping on orders over $125.

Hamels Fabrics (Chilliwack, BC)
Excellent, large selection of fabrics.
Shipping:
Starts at $5.50 depending on how much you spend.
FREE shipping on orders $200 or more.

Log Cabin Yardage (Pickering, ON)
They have a good fabric club that offers six fat quarters for $22.60/month (includes shipping).
Shipping:
$7 for orders up to $30.
$10 for orders between $30.01and $100
$15 for orders over $100.

Mad About Patchwork (Stittsville, ON)
Great selection of fabrics at reasonable prices.
Shipping:
Order less than $175 - 7.95
Orders over $175 - FREE

Mad Moody Quilting Fabrics (Pincourt, QC)
Shipping:
Free shipping over $100
Discount shipping for Canadian customers. (See website for details)

Paisleys Quilt Shop (Ottawa, ON)
Large collection of William Morris prints.
If you love William Morris fabric as much as I do, you will love this shop.
Shipping: Contact store for shipping rates.

Royal Quilts (Niagara Falls, ON)
Shipping: $5.99 flat rate shipping on all orders up to $99.
Once your order is at $100, your shipping is FREE

Runaway Quilts (Edson, AB)
Shipping:
$0 to $15.00 - $6.50
$15.01 to $50.00 - $12.50
$50.01 to $100.00 - $15.00
$100.01 to $200.00 - $19.50
$200.01 and up - FREE Shipping

Sew Creative Quilting (Mount Brydges, ON)
Shipping:
$0 to $25 - $10
$25 to $174 - $20
Over $175 - FREE


Sew Sisters (North York, ON)
Good selection of notions, batting, and interfacing. Excellent selection of clearance fabrics.
Shipping:
$0 - $19.99 - $4.99
$20.00 - $100 - $8.99
Over $100 - FREE

Stitch It Central (London, ON)
Very good selection of products for quilters and needlework crafts.
Shipping:
Shipping costs are calculated based on the product weight and the destination of the order. Shipping rates will be displayed during the checkout process.

Stitch-in-the-Ditch (Kelowna, BC)
Sells a variety of products for quilters.
Shipping: Shipping costs are based on actual rates charged by Canada Post.

Taylor Sewing (Brockville, ON)
Up to $200 will ship for a flat rate of $15.00 by Canada Post.
Online orders over $200 will ship FREE by Canada Post.

A wide variety of beautiful quilting fabrics.
Shipping: Shipping costs are based on actual rates charged by Canada Post.

The Quilt Store (Newmarket, ON, Burlington, ON)
Great selection of fabric, sewing notions, sewing machines, etc.
Shipping:
Orders up to 5kg - $10
International & Heavy Goods Shipping - Orders over 5kg - $20
Orders over 10kg may incur additional freight charges.

Thread Count Fabric (Souris, MB)
Nice variety of fabrics and beautiful canvas prints.
Shipping:
Orders over $99 - Free Shipping
Orders under $99 - Flat Rate $8.49
Beautiful modern fabrics. Monthly stash builders program. Good shipping rates.
Shipping:
$0.00 - $44.99 - $5.95
$45.00 - $150.00 - $9.95
$150.00 + FREE

How to test fabric for fiber content in ONE EASY STEP


I occasionally pick up fabrics from thrift stores, and I can usually tell the difference between cotton and polyester, but there are times when I'm stumped by the blends. The ladies at So Sew Easy put together a good video on how to determine if your fabric is synthetic or the real deal. It's important to know what you're working with before it's too late. Case in point, I once made a whole wack of HSTs and when I went to press my first batch, one triangle on every HST shrunk because I didn't realize it was polyester/cotton. Why did the triangles shrink? The poly fibers in the fabric melted from the hot iron. Poly is short for polyethylene aka plastic.

See the video on YouTube: https://www.youtube.com/watch?v=oDXOl4UbSqU

How to Make Your Own Quilt Ruler Grips

How to Make Your Own Quilt Ruler Grips

Print Friendly and PDF

You can easily make your own quilt ruler grips in a few easy steps. I recently bought a couple of new quilt rulers, but I didn't think to get any quilt ruler grips. Also, the ones on my other rulers are starting to wear out a bit. So, wanting to pinch a penny, I decided to make my own ruler grips. They're really simple to make and you most likely have everything you need at home to get started.

YOU WILL NEED
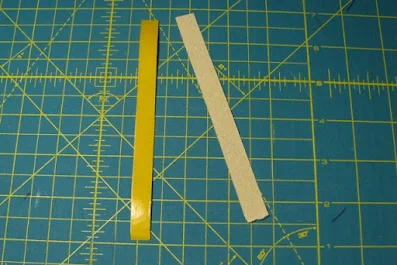
  • 1/2 inch double-sided tape 
  • *220 fine-grit sandpaper. 
  • an old pair of scissors (or utility knife)
*Don't use anything higher than 220 grit because it won't grab, and don't use anything lower than 180 grit because it could damage delicate fabrics.

      Supplies Needed to make Quilt Ruler Grips


      INSTRUCTIONS

      1. Stick a strip of the tape on the paper side edge of the sandpaper.

      Quilt Ruler Grips - Step 1

      2. With scissors or utility knife, cut along the side of the tape to make a strip of sandpaper. Do this over some old newsprint to catch any loose sand. I made a couple strips for future use.

      Quilt Ruler Grips - Step 2

      3. Cut 1/2 inch squares from the strip.

      Quilt Ruler Grips - Step 3

      4. Peel the tape paper off to expose the sticky side and stick your grips to the back of your quilt ruler.

      Quilt Ruler Grips - Step 4

      Make Perfect Pinwheels Every Time!

      I love the pinwheel block. It’s a timeless classic that can easily be incorporated into traditional as well as modern quilt designs, but piecing all those little triangles is a pain. Below is a quick method for making any size Pinwheel block you need.


      FORMULA FOR QUICK PINWHEELS

      Note: The finished block size is the size of the block after the quilt is finished.
      1. Determine the finished block size, e.g. 6 inches
      2. Divide the finished block size by 1.41. (6 ÷ 1.41 = 4.25)
      3. Add this result to 0.875 (4.25 + 0.875 = 5.13)
      4. Round up the above result to the nearest 0.125 inches. (5.13 + 0.125 = 5.25")
      5. The parent size squares will be 5.25"
      6. Square up your block to the correct unfinished size (finished size plus 1/2")

      CUTTING + ASSEMBLY INSTRUCTIONS

        4 Quilting Apps You Can Not Live Without: 2016


        UPDATED: June 06, 2021

        Back when I first started quilting, I struggled with yardage calculations, resizing blocks and any other kind of quilting math. Everything was done manually back then. Most of the time I'd just wing it when it came to buying yardage, but that was risky. Resizing blocks was done with graph paper and pencil unless I had a magazine to give me the templates. I didn't even have a rotary cutter! Now technology is helping quilters with all this math stuff and I love it. Here are four quilting apps that will make your quilting a little easier.
        "Master the math involved in quilting! Robert Kaufman Fabrics and Quilters Paradise have joined forces to bring you this updated collection of eight essential quilting calculators. Designed by quilters, the calculators work with both U.S. and metric measurements. With these tools you’ll easily and accurately work out how many rectangular pieces can be cut from a larger piece, or how much fabric is needed for backing, batting and borders, square-in-a-square, set-in and corner triangles."

        I love this app because it does all the quilting math work for you, which is great for me because I'm pretty much math-challenged. It has several calculations, but my favorites are backing and batting measurements, binding yardage needed, and piece count (calculates the number of pieces you can cut from a larger piece of fabric).

        2. Quilt Creator by Crochet Designs
        "Create quilts using over 200 quilt blocks to select from. You can then change the colors in the blocks to get the look you want."

        3. How Much Thread by Superior Threads (This app is no longer available)

        4. Color Gear by Appsvek ($1.99)
        "Color Gear is a handy professional tool that helps to create harmonious colour swatches. To find the perfect colour combination, designers and artists use colour theory and the basis of it: colour wheel and harmonies. You don't need to be a colour expert in order to use this app – Color Gear is a user friendly application suitable for beginners and pro. Perfect app for understanding colour theory and daily working with palettes. Works offline."

        How To Make Fabric Foundations for Fabric Art


        Are you looking for ways to use up small fabric scraps that are too small for anything? I discovered a fun way to do this by making what I call scrap sandwiches. It's not a new concept, but I couldn't find any good tutorials for it, so I decided to make my own instructions. I’ll sometimes spend an afternoon making these. It’s a fun and mindless project that produces interesting and beautiful textures and colour combinations that can be incorporated into your art quilts or mixed media projects. I’ve used them for quilt art postcards, makeup bags, and book covers. 

        Fabric sandwiches were incorporated into my art quilt Mother Ship that's on the Fall 2012 Quilting Arts Magazine cover in Fall 2012.


        Sister Moon by Monica Curry - Fabric Collage
        Sister Moon by Monica Curry

        Knowledge by Monica Curry - Fabric Collage
        Knowledge by Monica Curry

        Salmon Run by Monica Curry - Fabric Collage
        Salmon Run by Monica Curry

        Untitled by Monica Curry - Fabric Collage
        Untitled by Monica Curry

        INSTRUCTIONS


        YOU WILL NEED
        • Fabric scraps.
        • Lightweight muslin or any lightweight non-stretchy fabric cut to 9 x 12 inches.
        • One piece of tulle cut to 11 x 14 inches.
        • Thread
        • Pins
        • Sewing machine
        While working on a project, I throw my fabric scraps in a box I have under my work table. After I have a big enough stash of scraps, I sort everything according to colour and store them in plastic bags.

        fabric scraps for mixed media art


        1.  FOUNDATION LAYER
        Start your sandwich with a lightweight, non-stretchy, foundation piece approximately 9 inches by 12 inches. This is the easiest size to work with. I use a light, inexpensive muslin for the foundation, but anything lightweight and non-stretchy will work. You can also use a coloured foundation that works with the scrap colours.

        mixed media fabric art 1

        2.  MIDDLE LAYER
        Pick the colours you want to work with. You can use monochromatic colours, contrasting colours, or grab a bunch of random colours. Start placing your fabric scraps down on the foundation until you've covered it as much as you can.

        mixed media fabric art 2

        mixed media fabric art 3

        3.  TOP LAYER
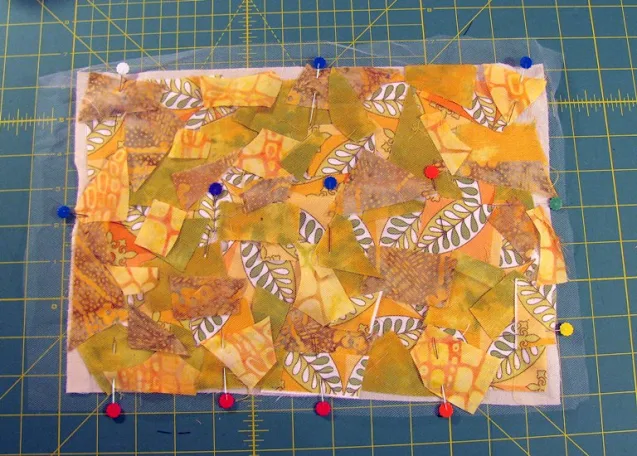
        After all the scraps are put down on your foundation layer, cover these two layers with a piece of tulle about two inches wider than your foundation piece (11" x 14") giving you an overhang of 1 inch all the way around. Pin these three layers down around the edges and in the middle.

        mixed media fabric art 4

        4.  STITCH AROUND OUTER EDGE
        Once the three layers are pinned securely, stitch around the edge of the sandwich with a basting stitch creating a seam width of about 1/2 inch.

        mixed media fabric art sewing

        mixed media fabric art sewing detail

        5.  QUILT
        After you’ve sewn around the edge, sew a line across the length and the width of the sandwich. Then stitch a grid at least 3" in width. Your grid can be as small as you like, but don’t go wider than 3" because your scraps could start to shift around too much during the next step.

        mixed media fabric art finished

        6.  When you’ve completed stitching your grid, you now get a chance to use some of those decorative stitches you have on your sewing machine. If you’re like me, you may not use them very often. Pick a decorative stitch and, starting at one edge of the sandwich, sew to the other edge. There is no hard and fast rule about this. Just pick out a bunch of nice stitches to use and sew along the sandwich randomly. I experimented with my alphabet stitch for this project and really liked the outcome. You can also use free-motion stitching which can produce some beautiful results.

        mixed media fabric art details

        7.  When all your stitching is complete, trim the excess tulle along the outer seam line to clean up the edges. I do this because I find the excess tulle snags on things when you work with the sandwich later.

        8.  Turn the sandwich over face down and press on the wrong side so you don’t gum up your iron with melted tulle. You can see in this photo the grid width and where I’ve sewn the decorative stitches randomly across the sandwich.


        TIPS

        • Sprinkle thread, ribbon, yarn, or lace scraps on top of the fabric layer before adding the tulle layer.
        • Try using a foundation piece made from used dryer sheets that have been stitched together.
        • Print images or lettering on fabric that can be incorporated into the scrap layer.
        • If the piece isn’t going to be washed, add bits of pretty paper or newsprint to the scrap layer.
        • Use a foundation piece colour to coordinate with the scraps.
        • Experiment and have fun!