Like most quilters, my fabric stash often fills up faster than I can store it, ending up with me not knowing what I have or what I don't have. Thankfully, I love organizing and having a place for everything and everything in its place.
I normally buy fat quarters and charm packs for my projects, so I needed a storage solution that would keep them nicely organized and in plain sight. After much experimenting, I came up with a box that's perfect for storing fat quarters and charm packs.
I normally buy fat quarters and charm packs for my projects, so I needed a storage solution that would keep them nicely organized and in plain sight. After much experimenting, I came up with a box that's perfect for storing fat quarters and charm packs.
YOU WILL NEED
- Download the Fat Quarter Storage Box template HERE
- Printer
- [1] 24"x 36" cardboard sheet, cut into two 24" x 18" sheets. (Cardboard sheets can be purchased at any art store).
- tape (I used masking tape)
- double-sided tape
- spray glue or large glue stick
- pencil
- utility knife
MAKING THE BOX TEMPLATE
1. Print the [4] four template pieces.

4. With spray glue or a glue stick, glue the assembled template to the first sheet of cardboard. (Fig 2)

5. With a utility knife, carefully cut out the template along the outer edges.


This isn't the prettiest box I admit, but it does the job. You could spray paint it, cover it with Mactac, or use nicer cardboard.
2. Cut along the inner edges of the template pieces.
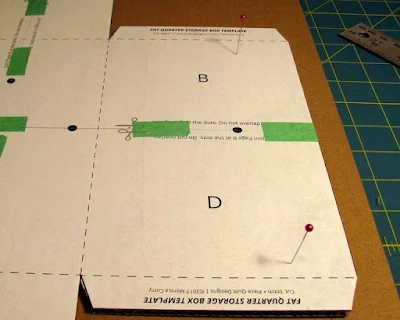
3. Line up the pieces using the dots then tape together. Do not overlap. (Fig 1)
3. Line up the pieces using the dots then tape together. Do not overlap. (Fig 1)

4. With spray glue or a glue stick, glue the assembled template to the first sheet of cardboard. (Fig 2)

5. With a utility knife, carefully cut out the template along the outer edges.

HOW TO MAKE THE FAT QUARTER BOX
1. Pin the template to the second cardboard sheet; you maybe don't want to use your best pins for this. Trace the template and carefully cut out this piece with a utility knife.

2. Lightly score the cardboard on the dotted lines on the template.
3. Gently bend the box at the scored lines.
4. Using double-sided tape or glue, join the flaps to the outside of the box and add pressure to be sure the glue sticks.

3. Gently bend the box at the scored lines.
4. Using double-sided tape or glue, join the flaps to the outside of the box and add pressure to be sure the glue sticks.


Merry Christmas!
I hope you have a wonderful holiday season!


This comment has been removed by a blog administrator.
ReplyDelete